

前言
关于操作系统方面,我个人最开始使用的是Ubuntu并且还是版本比较新的22,24版本。我可以很负责的告诉大家他对于eda工具的兼容性并不好,相关的依赖库安装十分麻烦和繁琐。在安装完成后的使用也并不好,很容易发生奔溃,所以还是推荐大家使用CentOS7.9来作为工作系统。
对于eda工具不同版本和厂家间其实区别对于才入门的新手来说并不重要,这是学好之后才需要考虑的。我们入门需要的是先将流程跑通了,理解每一步的作用和必要性。大部分新手所能接触到的工具大部分都是盗版的,所以对于工具版本使用自己能找得到的版本就行了,如果实在想要较新版本,那只能是花钱了。
同时对于自己重要的工程和脚本,要进行多次备份,放在两个以上不同介质中最为稳妥。(为什么要两个以上,缘故就是我自己的工程数据全部在nas中,同时自己电脑有备份,结果两天之内nas机械硬盘全部损坏,台式机固态损坏)
关于虚拟机的选择我就不赘述了,这个就看个人了。因为我是有自己的服务器的所以使用的是PVE来安装虚拟机。
不提供软件程序,需要请留下邮箱。
同时有问题的朋友可以在下方留言,解决问题后我会在文章结尾添加相关问题和解决方法。
系统安装
一, 系统镜像下载
这里推荐使用华为镜像站来下载,在我下载时阿里的镜像站限速而华为的不限速。
阿里:下载 (ISO)
华为:下载 (ISO)
二, 系统安装
我所使用的PVE版本为8.3。
2.1 PVE前置设置
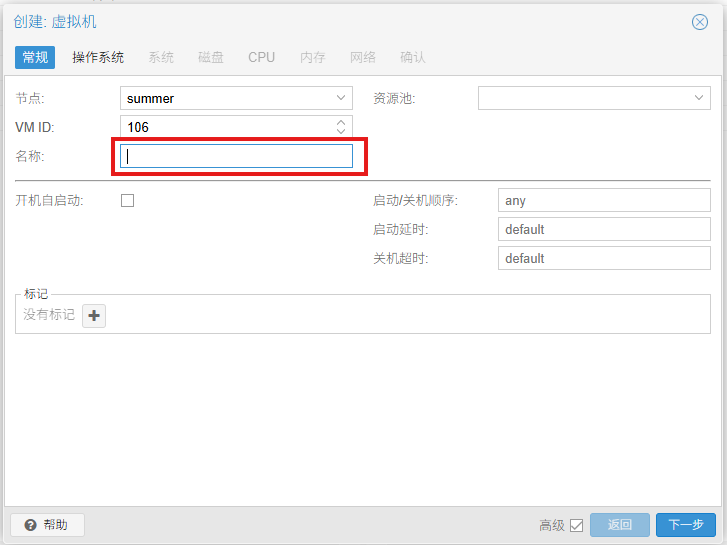
2.1.1 名称设置
填入虚拟机的名称,如我的EDASummer
2.1.2 镜像选择
在自己上传的储存位置选择CentOS7.9

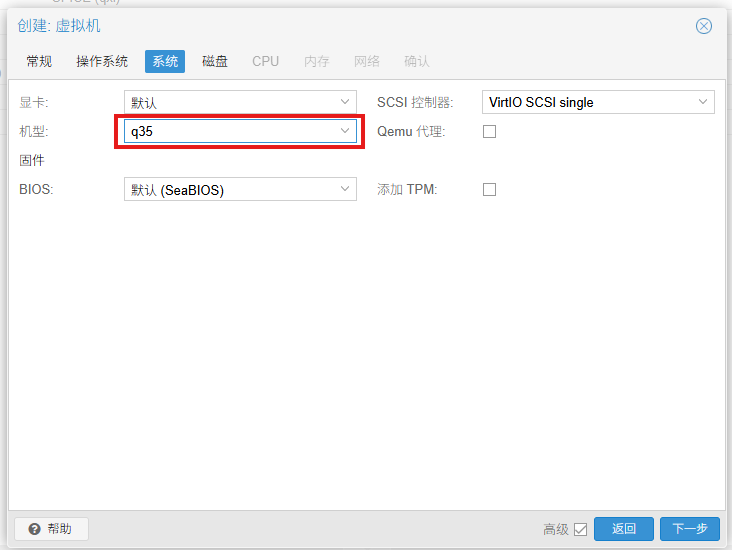
2.1.3 显卡机型选择
这里将机型改为q35
想要和虚拟机间复制粘贴功能的朋友可以将显卡改为SPICE
使用方法参考:
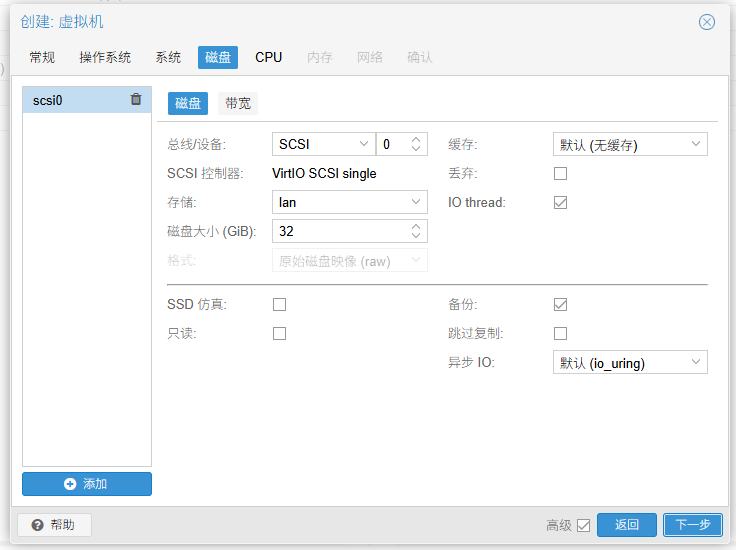
2.1.4 磁盘设置
这里按照自己剩余空间给 工程,软件,工艺库占用不小
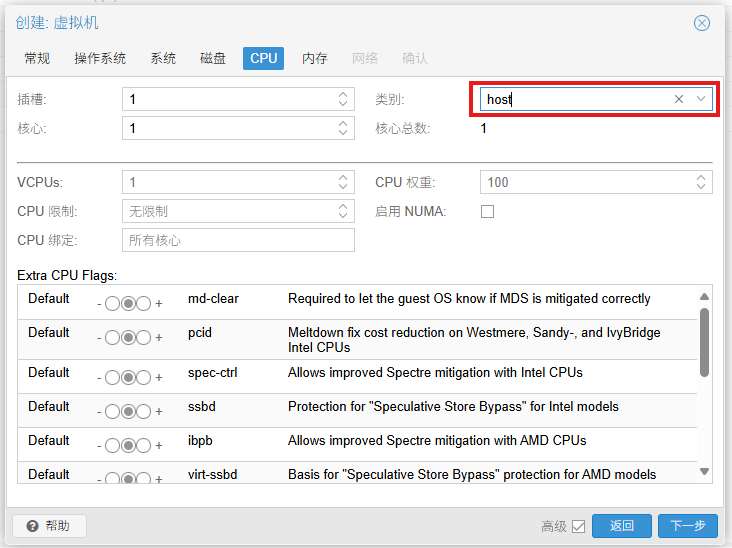
2.1.5 CPU设置
这里一定要注意!!类别选择host ,选择其他的EDA软件会出现bug。
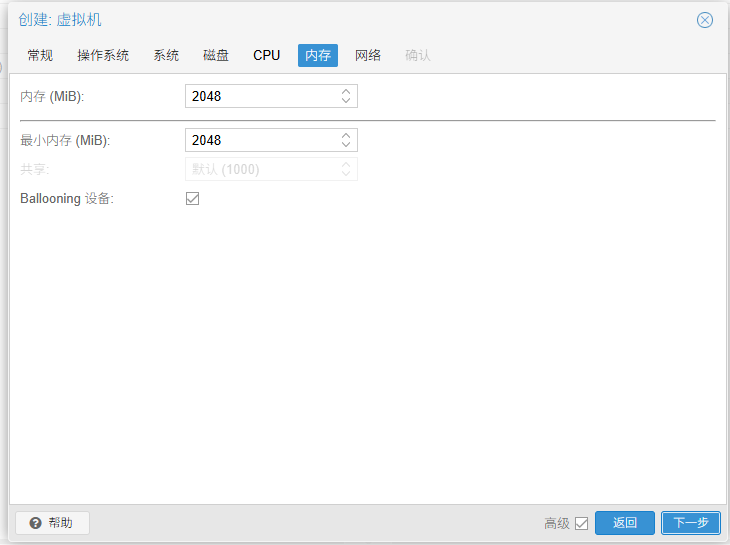
2.1.6 内存设置
不做大工程16GB都完全绰绰有余。
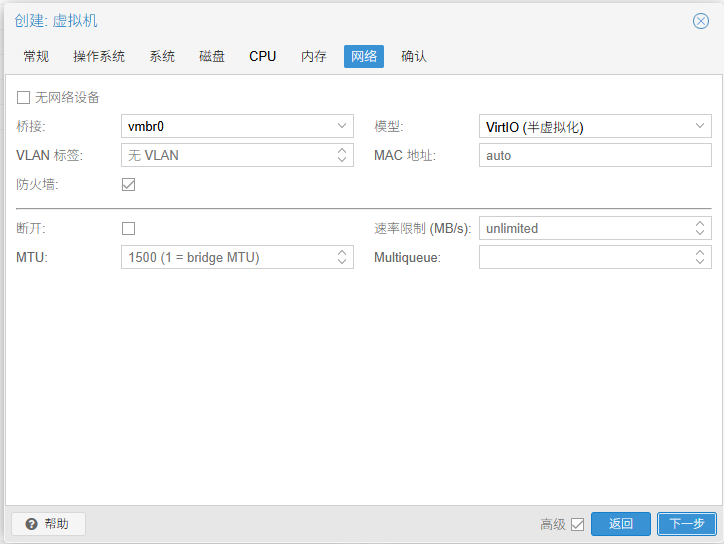
2.1.7 网络设置
默认就行
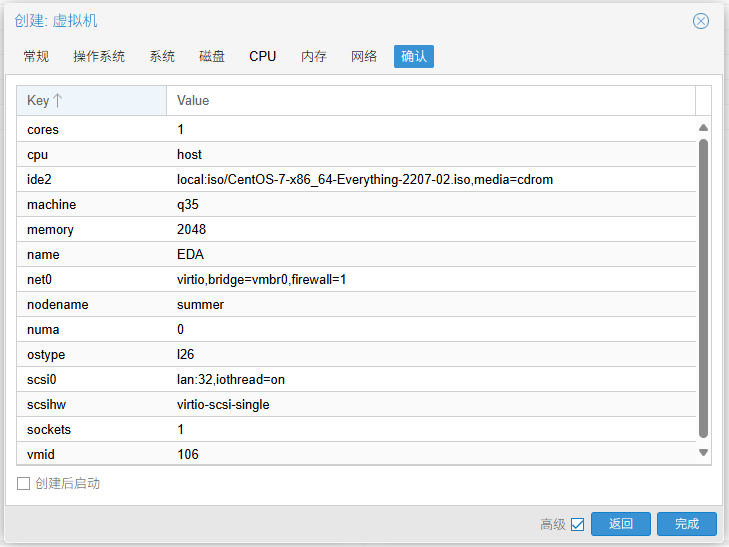
2.1.8 确认设置正确
2.2 CentOS7.9安装
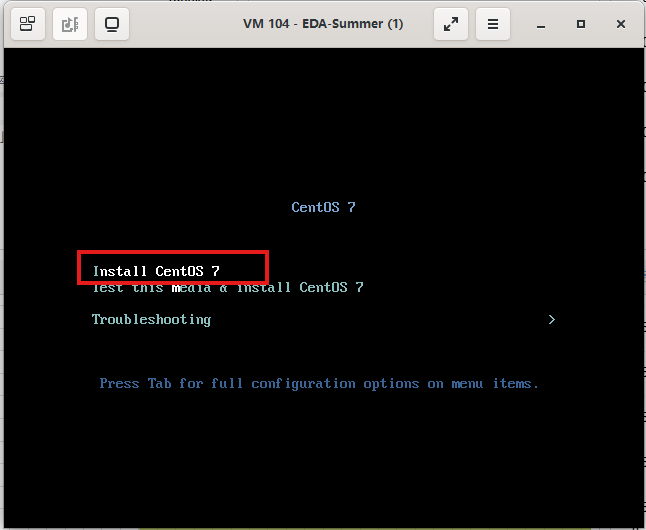
2.2.1 选择安装
2.2.2 需要修改项
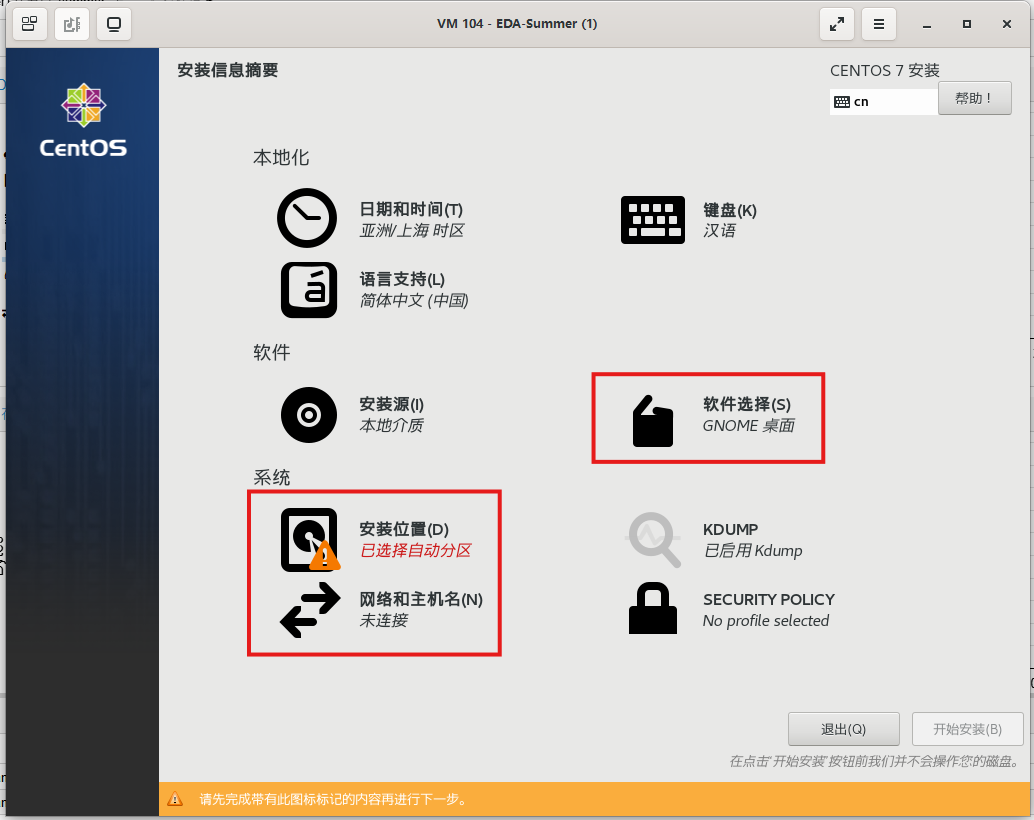
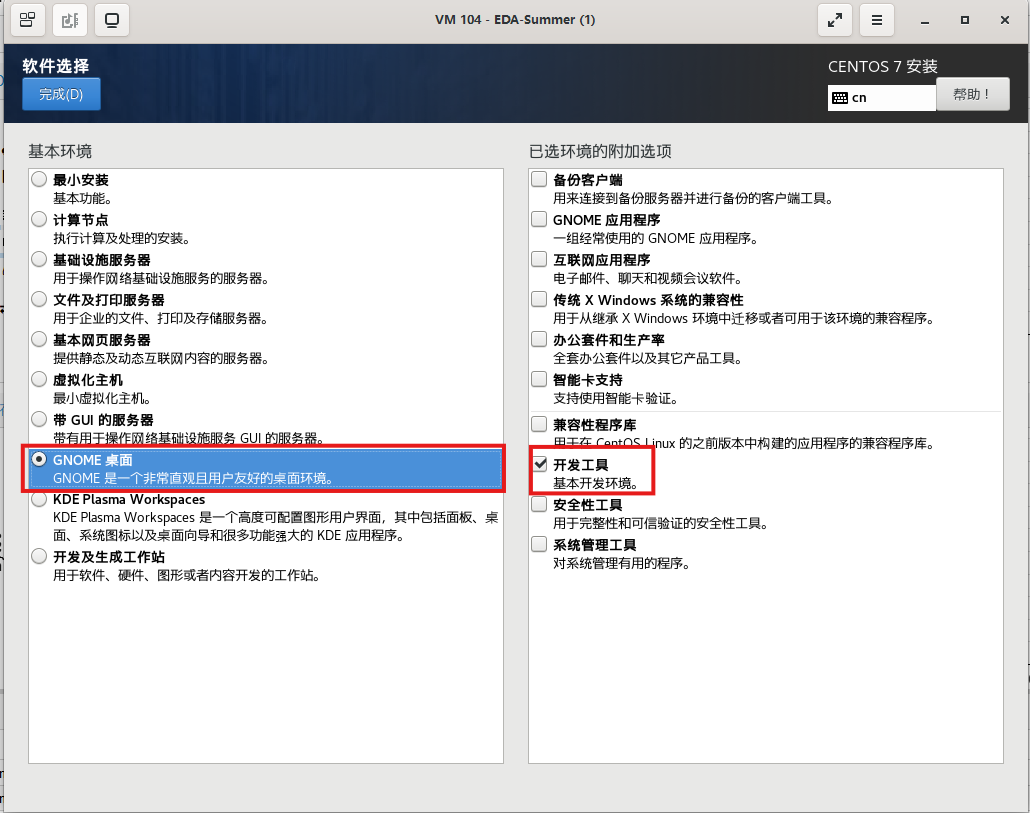
2.2.3 软件选择
选择 GNOME桌面 才有大家熟悉的图形界面。
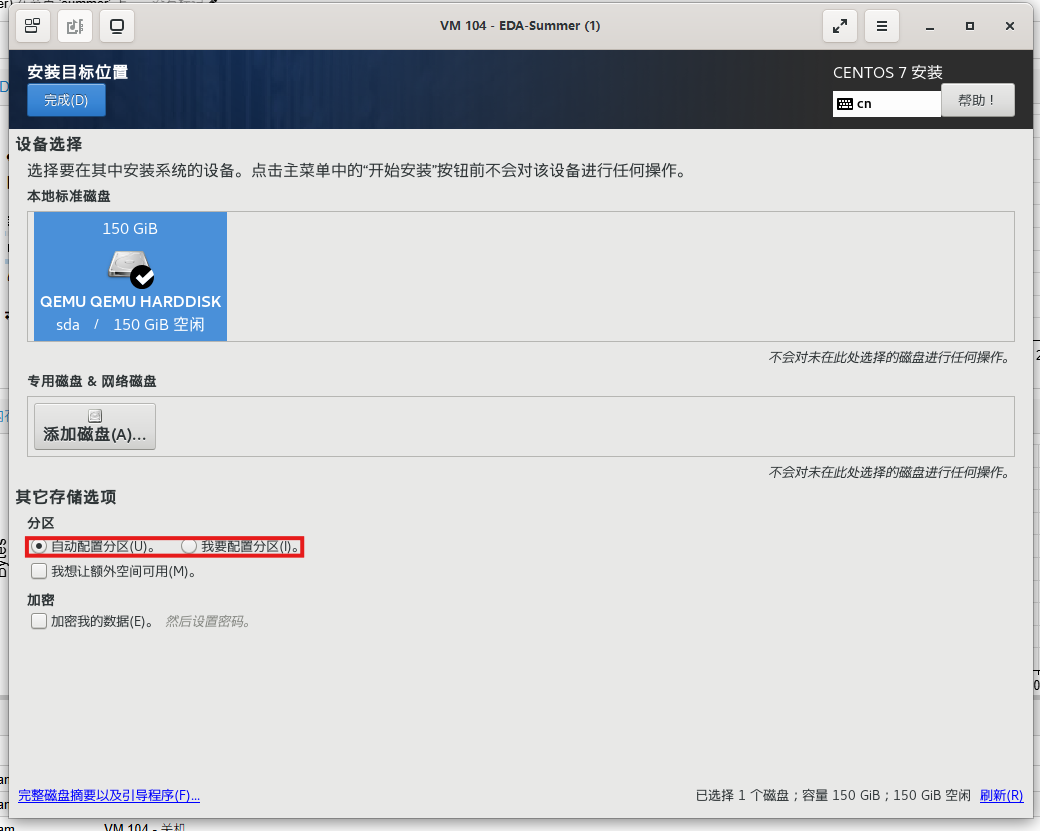
2.2.4 安装位置和分区
不会分区的朋友选择自动分区,如果想要自己分区的把大部分给/根目录就好了。同时请不要随便修改/home的挂载大小,没有/home挂载进不了桌面。
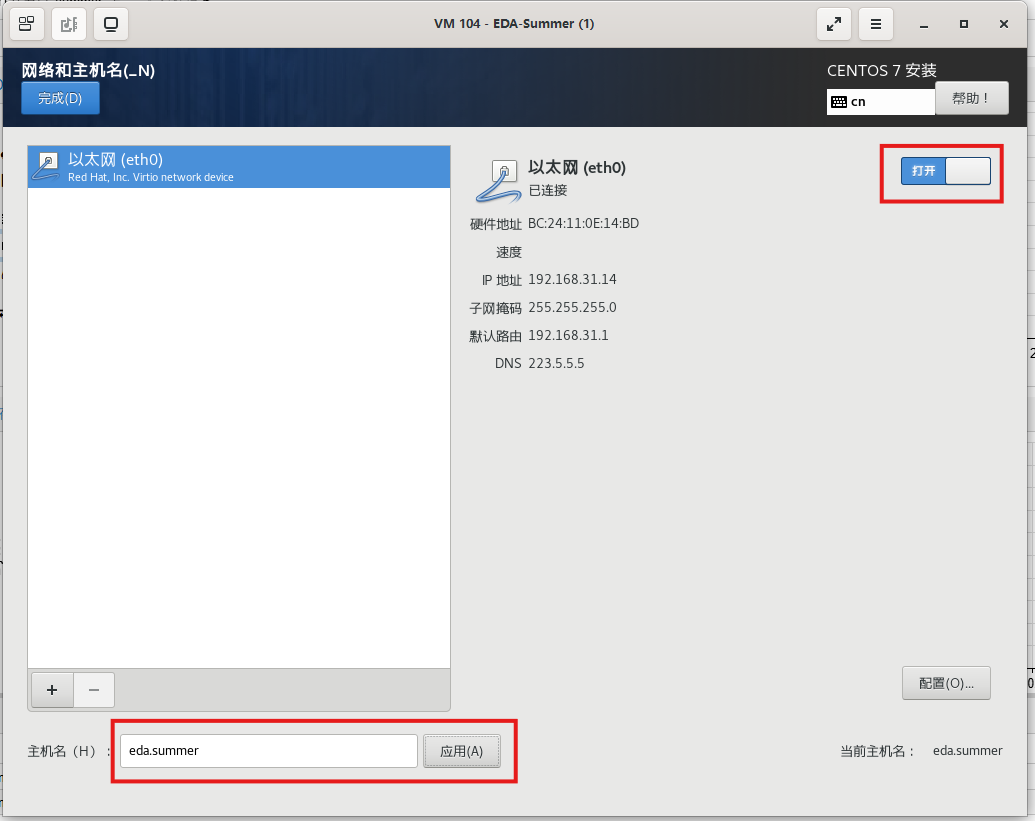
2.2.5 网络和主机名设置
将互联网设置为打开,主机名请设置为自己能记住的后面还会用,设置完成后开始安装。
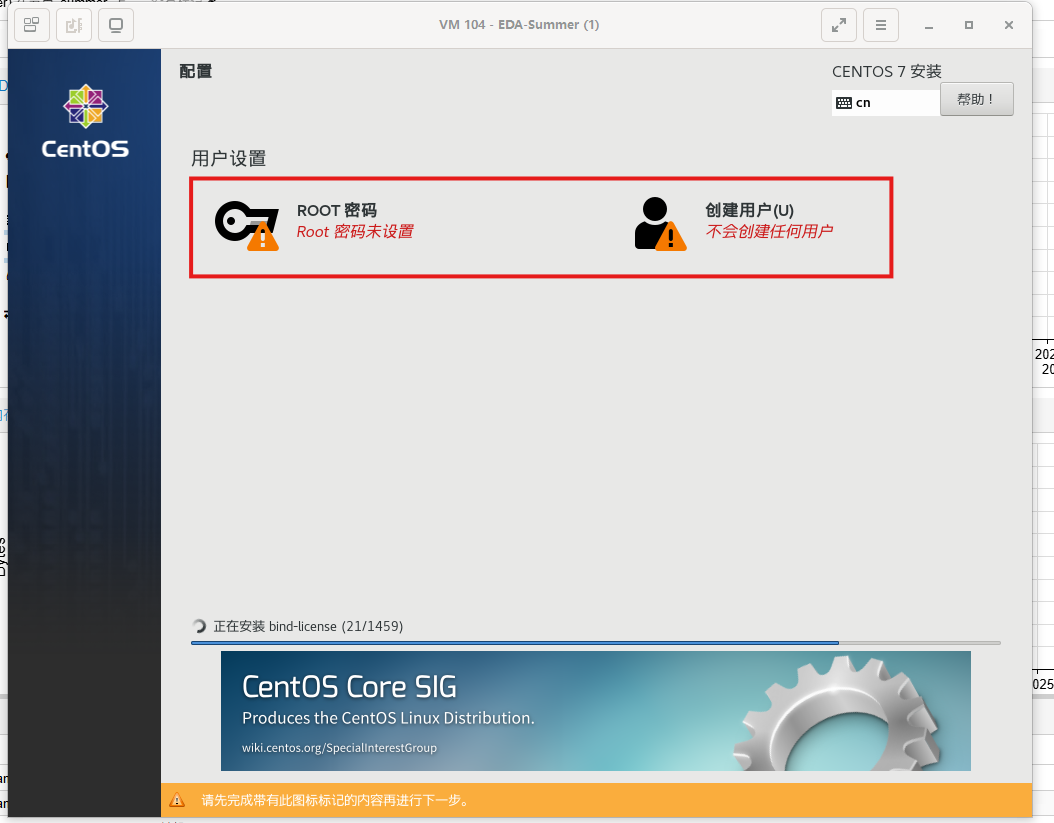
2.2.6 设置root密码和创建个人用户
开始安装后就可以进行设置,请千万得记住自己的root密码!!创建的用户就是后面我们所使用的用户。
三, 软件和环境配置
3.1 环境配置
这一步如果没有教程其实是最麻烦的部分
sudo yum install epel-release -y

sudo yum install unar -y

sudo yum install libXScrnSaver-1.2.2-6.1.el7

sudo yum install libtiff.so.3

sudo yum install redhat-lsb.i686

sudo yum install libpng12 -y

sudo yum -y update gcc

sudo yum -y install gcc+ gcc-c++

sudo yum install libtiff libtiff-devel

sudo ln -s /usr/lib64/libtiff.so.5/usr/lib64/libtiff.so.3

sudo yum install libmng -y

sudo yum install ksh

sudo yum install csh

sudo yum install python

sudo yum install libXp -y

sudo yum install libGLU -y

sudo yum install libXp.i686 -y

sudo yum install glibc-devel.i686 -y

sudo yum install xorg-x11-fonts-misc -y

sudo yum install -y motif.i686 motif.x86_64

sudo yum reinstall -y xorg-x11-fonts-misc xorg-x11-fonts-75dpi xorg-x11-fonts-100dpi

sudo yum install xterm -y

sudo yum install libstdc++.so.5 -y
3.2 Synopsys软件安装
3.2.1 安装安装程序
将SynopsysInstaller解压后运行*.run就可以成功安装
./SynopsysInstaller_v5.0.run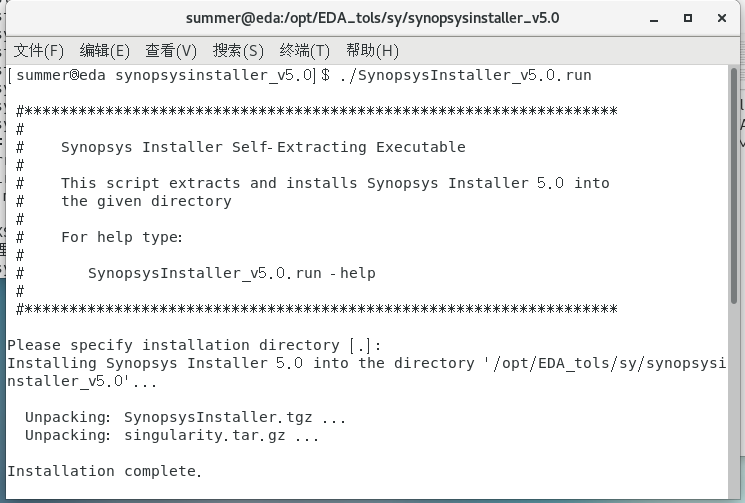
3.2.2 程序安装
必须安装scl ,其他软件按需安装
我所安装icc,icc2,pt,fm,vcs,syn,verdi,lc。ps、:lc与syn版本需要相同,关联需要在/opt/EDA/sy/lc/O-2018.06-SP1/admin/install 下选择关联软件并运行脚本。
重复下方步骤只修改软件安装包目录即可。
3.2.2.1 运行安装程序
./setup.sh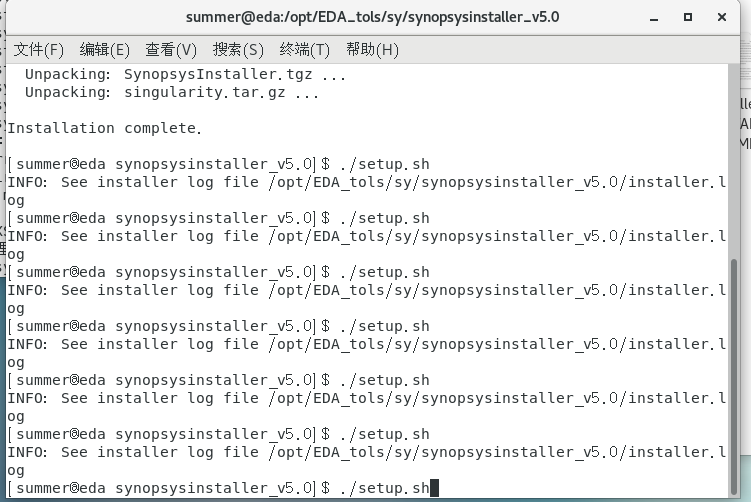
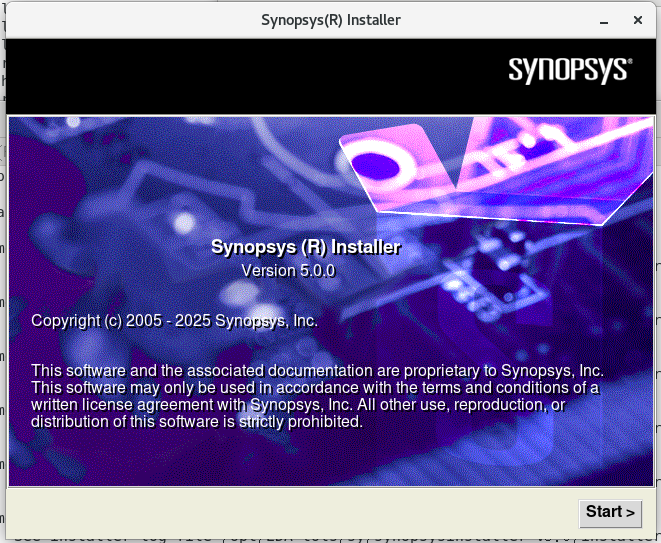
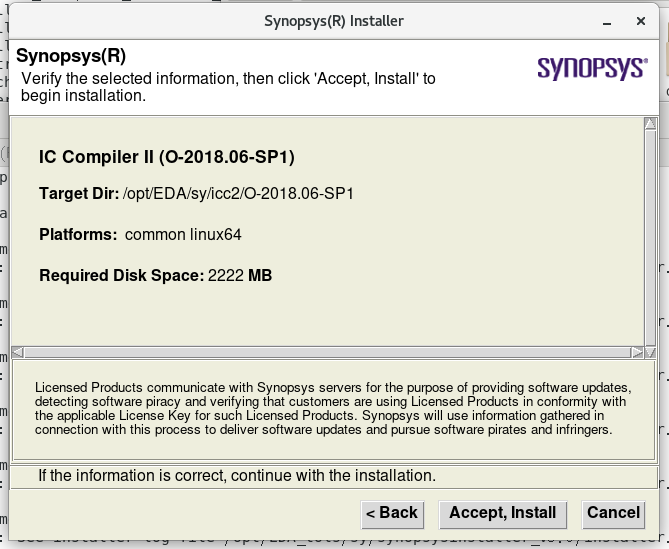
3.2.2.2 开始安装
点击Start
默认即可
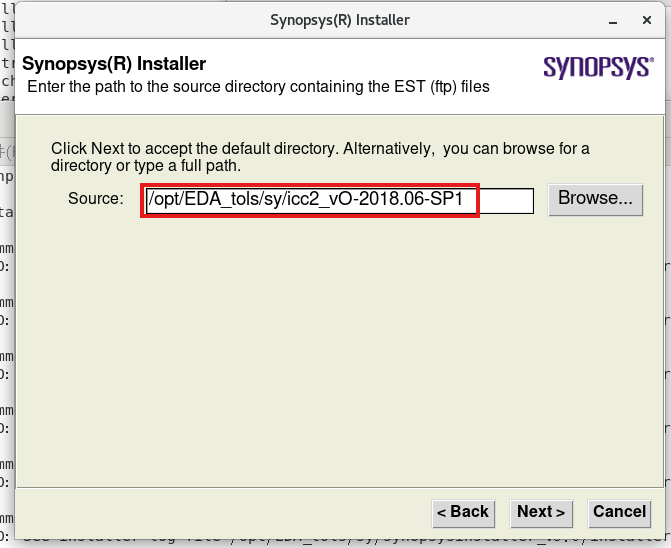
选择软件安装包目录
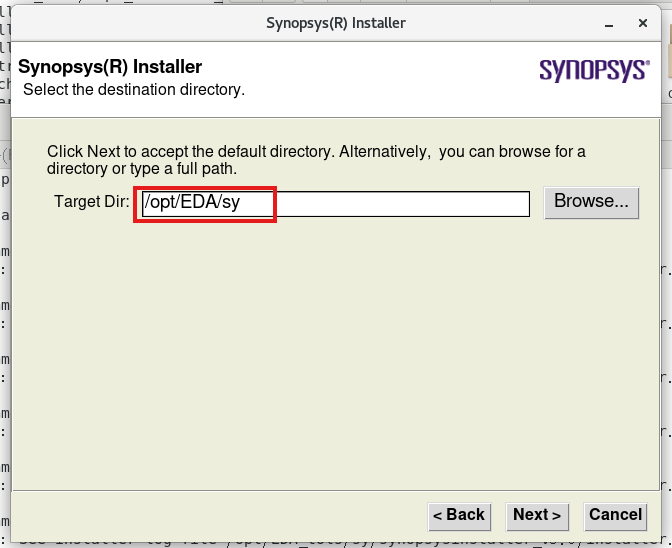
选择创建的安装目录,后续重复步骤不需要修改它自己会创建不同软件自己的目录。
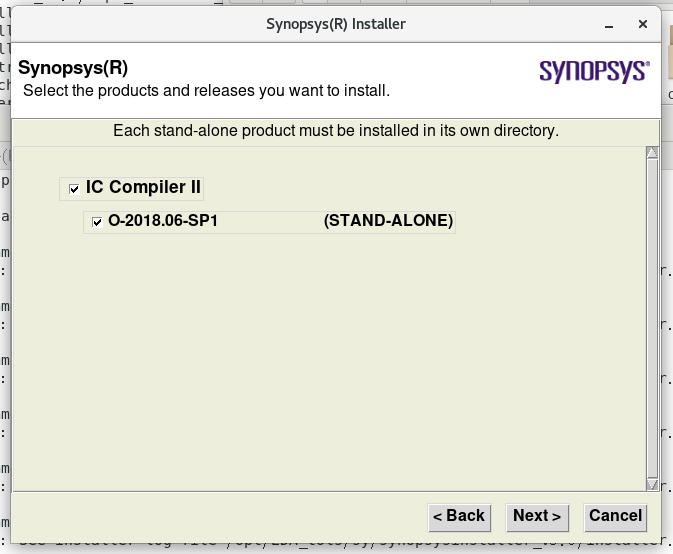
选择勾选后下一步

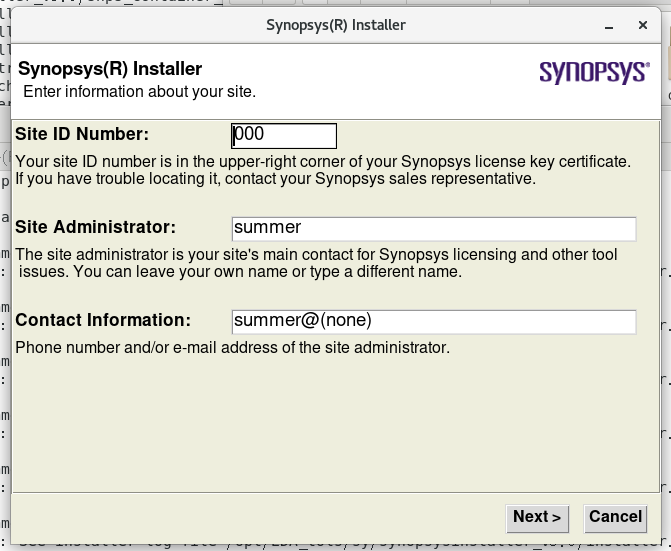
3.2.3 许可证生成(此步骤在win)
现在网上所提供的许可证没有icc2的许可,需要自己修改*.src 内容添加许可
解压scl_keygen程序,将我的.src覆盖原有的然后在Linux终端中输入并记录下方框起来的内容
一定要是eth0的!
hostname
ifconfig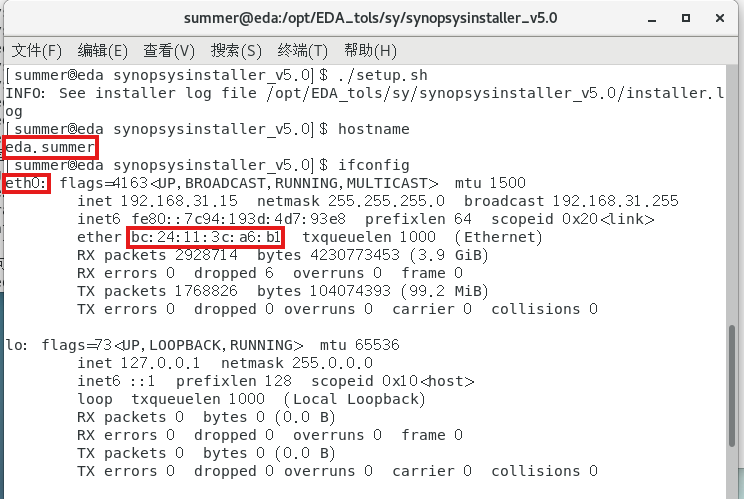
在程序中填写生成许可
记得去除
:
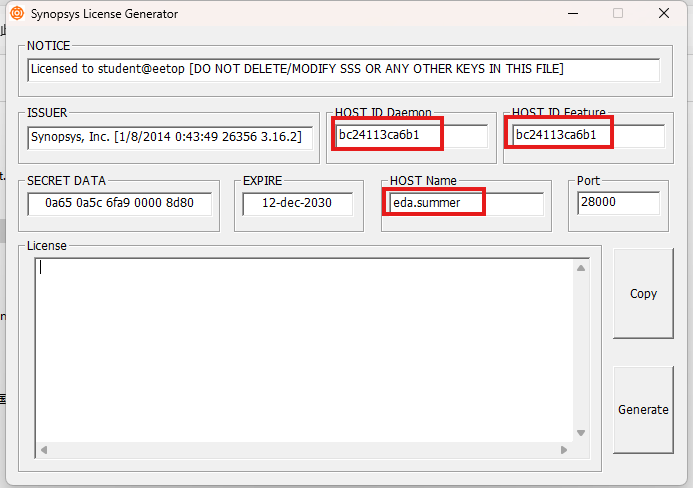
然后打开生成的Synopsys.dat在第二行添加/opt/EDA/sy/scl/2018.06/linux64/bin/snpslmd
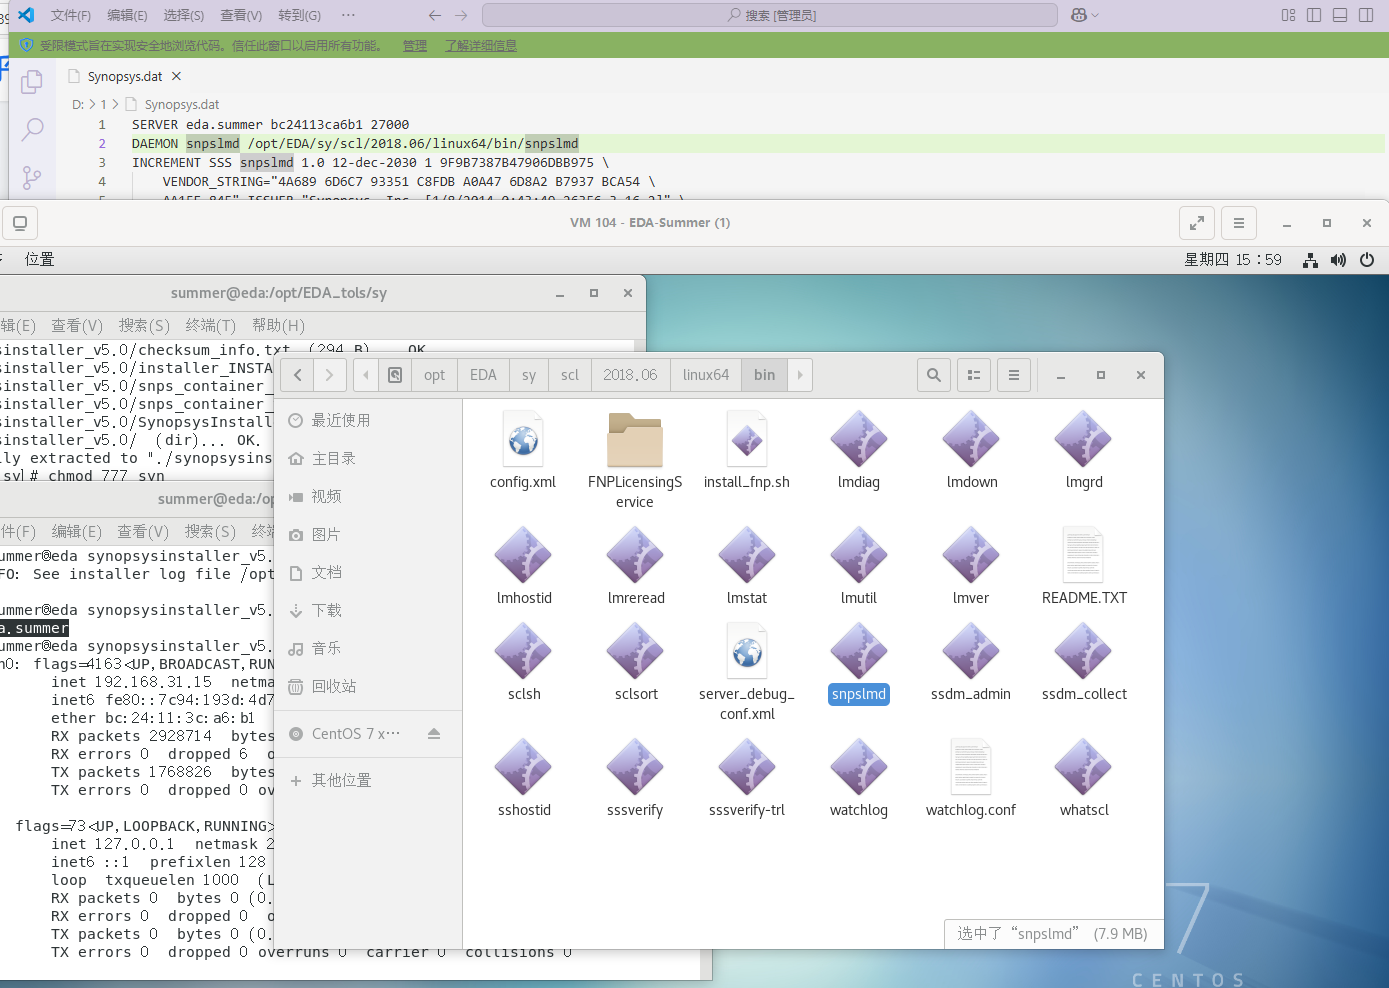
保存后将Synopsys.dat 放入自己安装的scl的scl/2018.06/admin/license目录下
3.2.4 配置环境
在home目录下编辑.bashrc ,不会使用终端的使用Ctrl+H 可看见隐藏文件双击编辑。
添加下方,将安装目录修改成自己的
########################### Synopsys ###############################
#Set Synopsys Directory
export Synopsys_Dir=/opt/EDA/sy
#安装目录


#SCL
export SCL_HOME=$Synopsys_Dir/scl/2018.06
export PATH=$SCL_HOME/linux64/bin:$PATH

#SNPSLMD_LICENSE_FILE
export SNPSLMD_LICENSE_FILE=28000@eda.summer

#ICC
export ICC_HOME=$Synopsys_Dir/icc/O-2018.06-SP1
export PATH=$ICC_HOME/bin:$PATH

#ICC2
export ICC_HOME=$Synopsys_Dir/icc2/O-2018.06-SP1
export PATH=$ICC_HOME/bin:$PATH

#Prime Time
export PT_HOME=$Synopsys_Dir/pts/O-2018.06-SP1
export PATH=$PT_HOME/bin:$PATH

#Verdi
export VERDI_HOME=/opt/EDA/sy/verdi/Verdi_N-2017.12-SP2
export PATH=$VERDI_HOME/bin:$PATH

#VCS
export VCS_TARGET_ARCH=linux64
export VCS_HOME=$Synopsys_Dir/vcs/O-2018.09-SP2
export PATH=$VCS_HOME/bin:$PATH
#注:在用VCS仿真生成fsdb格式的波形文件的时候,需要NOVAS_HOME变量指向Verdi的安装路径
export NOVAS_HOME=$VERDI_HOME  # 必须指向Verdi安装根目录
export LD_LIBRARY_PATH=$VERDI_HOME/share/PLI/VCS/linux64:$LD_LIBRARY_PATH

#Syn
export Syn_HOME=$Synopsys_Dir/syn/O-2018.06-SP1
export PATH=$Syn_HOME/bin:$PATH

#Formality
export Formality_HOME=$Synopsys_Dir/fm/O-2018.06-SP1
export PATH=$Formality_HOME/bin:$PATH

#Starrc
export Starrc_HOME=$Synopsys_Dir/starrc/O-2018.06-SP1
export PATH=$Starrc_HOME/bin:$PATH

#LC
export LC_HOME=$Synopsys_Dir/lc/O-2018.06-SP1
export PATH=$LC_HOME/bin:$PATH
export SYNOPSPS_LC_ROOT=$LC_HOME/linux64/lc/shlib/

#Hspice
export Hspice_HOME=$Synopsys_Dir/hspice/N-2017.12-SP2
export PATH=$Hspice_HOME/hspice/bin:$PATH

#Custom wave view
export Custom_wv_HOME=$Synopsys_Dir/wv/N-2017.12-SP2
export PATH=$Custom_wv_HOME/bin:$PATH

#Alias
alias icc2="icc2_shell"
alias icc="icc_shell"
alias pt="pt_shell"
alias ptgui="primetime"
alias dc="dc_shell"
alias fm="formality"
alias starrc="StarXtract"
alias dv="design_vision"
alias lc="lc_shell"


##############################Start path setting alias#################
#start up scl
alias lmgrd="lmgrd -c /opt/EDA/sy/scl/2018.06/admin/license/Synopsys.dat -l /opt/EDA/sy/scl/2018.06/admin/logs/debug.log"

#shut down scl
alias lmdown="lmdown -c /opt/EDA/sy/scl/2018.06/admin/license/Synopsys.dat"
#Alias
alias icc2="icc2_shell"
alias icc="icc_shell"
alias pt="pt_shell"
alias ptgui="primetime"
alias dc="dc_shell"
alias fm="formality"
alias starrc="StarXtract"
alias dv="design_vision"
alias lc="lc_shell"
这部分是方便记忆启动的如:dc,lc等可修改成自己习惯的。
将下方/opt/EDA/sy/scl/2018.06/admin/license/ 路径改成自己的,将刚刚生成的许可放在该目录下。
##############################Start path setting alias#################
#start up scl
alias lmgrd="lmgrd -c /opt/EDA/sy/scl/2018.06/admin/license/Synopsys.dat -l /opt/EDA/sy/scl/2018.06/admin/logs/debug.log"
#shut down scl
alias lmdown="lmdown -c /opt/EDA/sy/scl/2018.06/admin/license/Synopsys.dat"
这部分是启动许可和关闭许可,每次重启需要运行一次lmgrd ,同时可以将alias后的lmgrd修改为自己习惯的。
修改完成后
source ~/.bashrc就可以试试成功与否
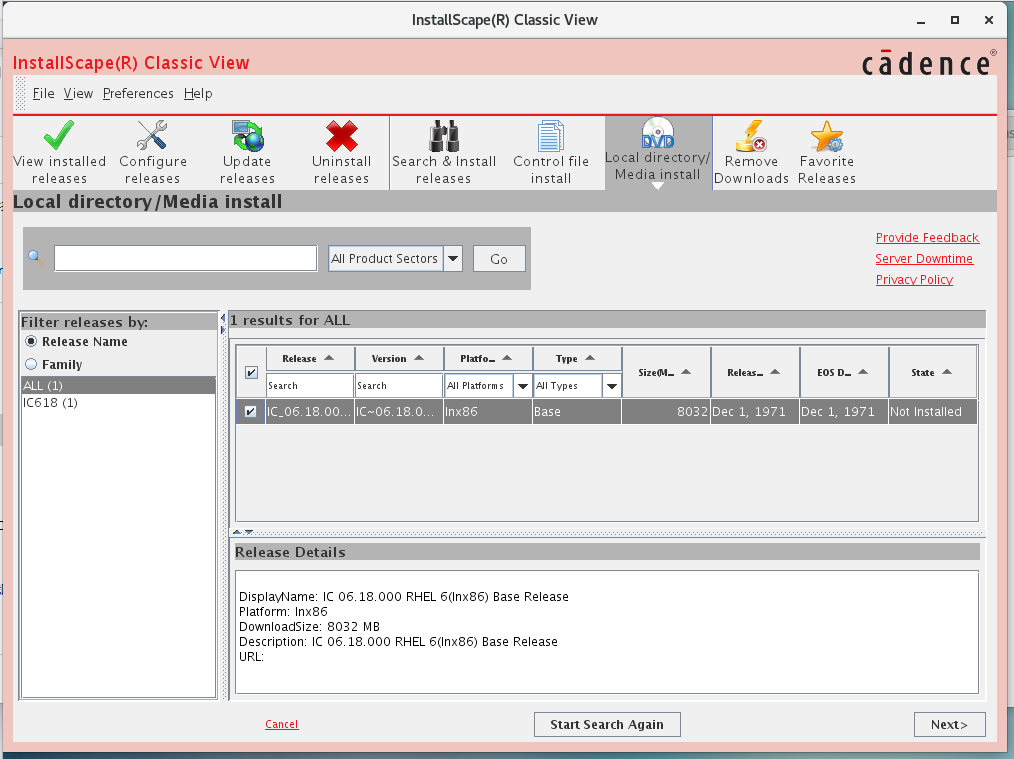
3.3 Cadence软件安装
3.3.1 安装安装程序
将InstallScape解压了然后运行下方(将地址改成自己的)
zcat /opt/EDA_tols/ca/03.InstallScape/IScape04.23-s010lnx86.t.Z | tar -xvf-3.3.2 安装程序
与Synopsys相同安装步骤重复
解压完成后在bin目录下有iscape.sh,运行它
./iscape.sh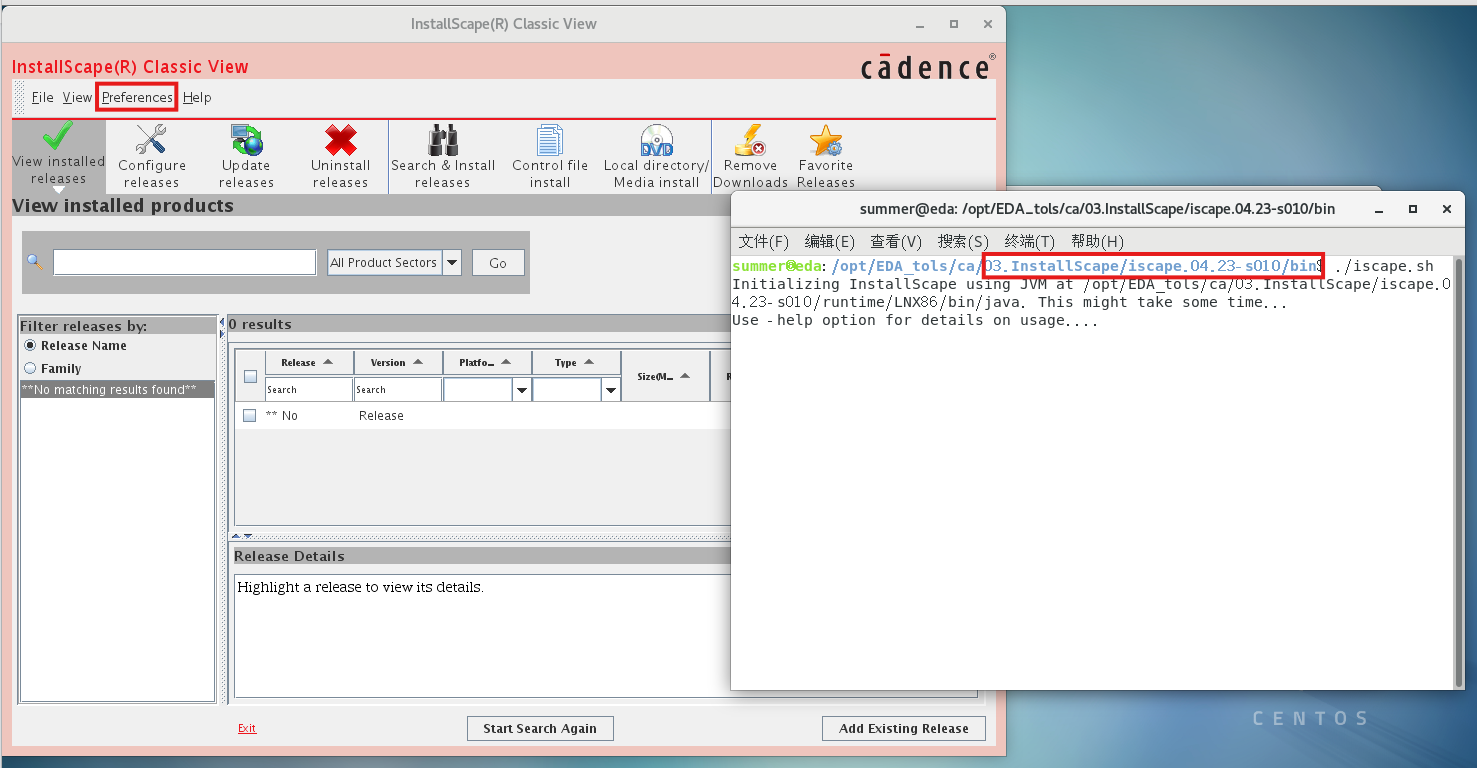
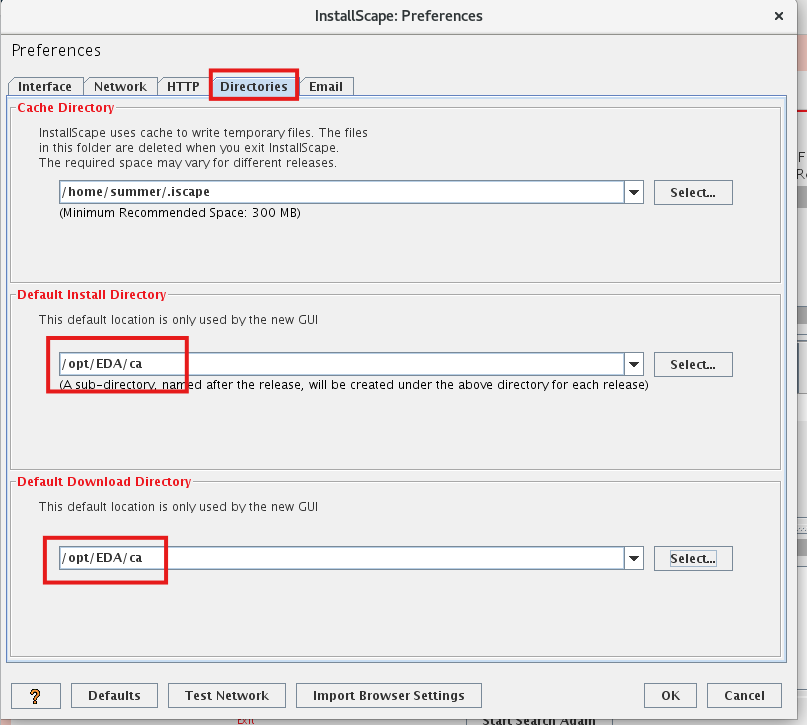
然后点击Preferences,它只有一个选项选择它
然后将下方换成自己的安装目录,修改完成点击OK
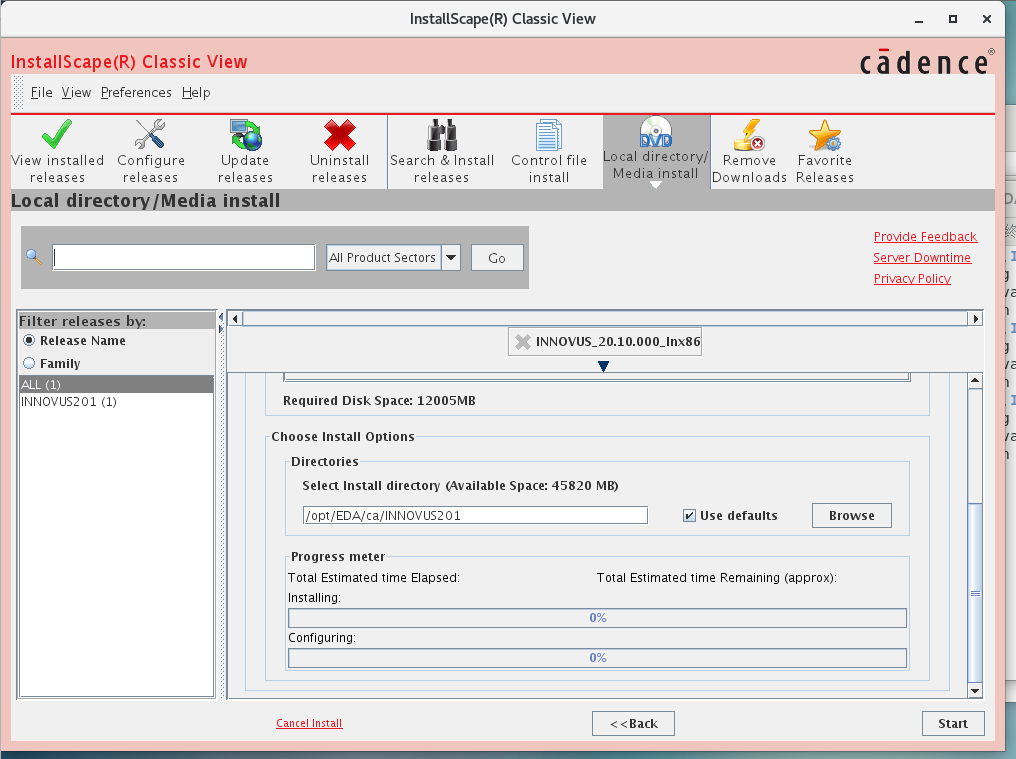
然后将软件全部解压,他们可以解压在同一个文件夹下不会重复。
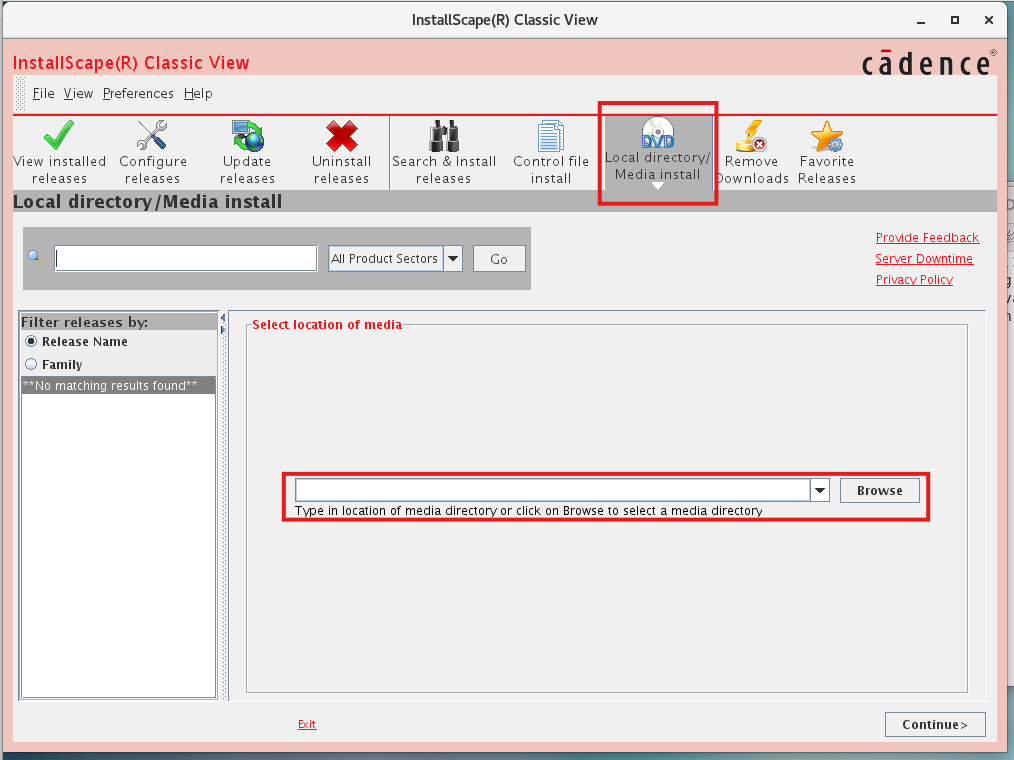
然后选择到解压的目录
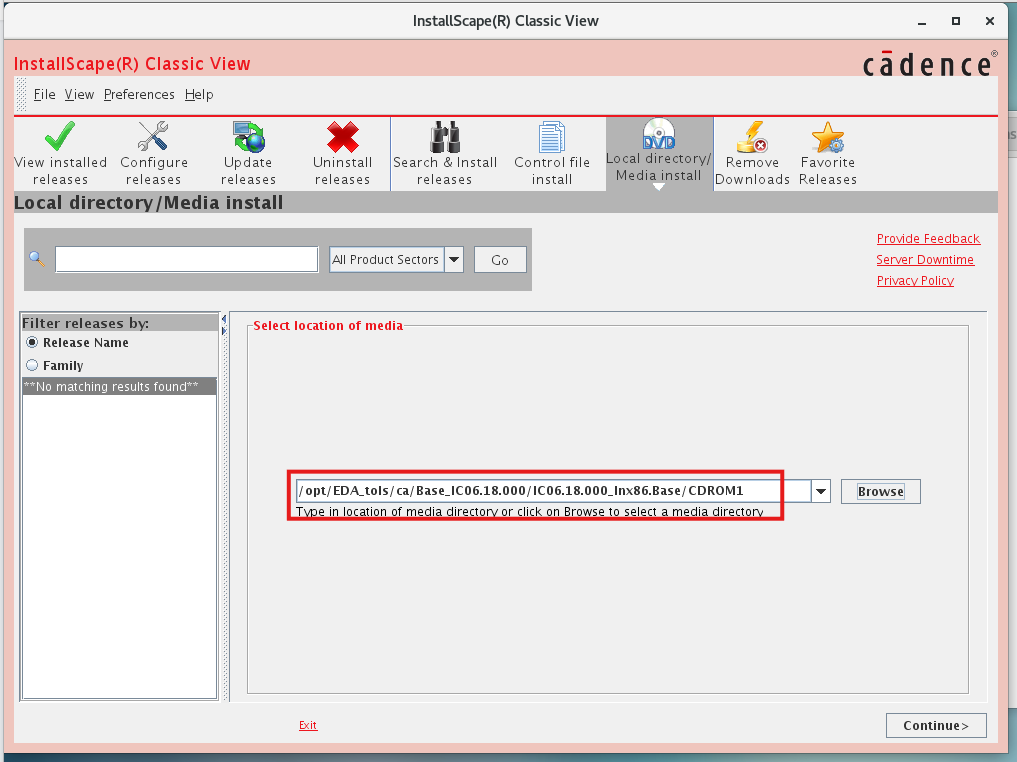
勾选后下一步
Start开始安装
3.3.2.1 1patch软件
将ocad 解压后在其bin目录下
./1patch -ecc /opt/EDA/ca/INNOVUS201/opt/EDA/ca/INNOVUS201为软件安装路径
3.3.3 生成许可和环境配置
将patch 下载完成后
python cdslicgen.py生成license,将生成的license复制到安装软件的share/license/中
如我的安装路径就是在/opt/EDA/ca/INNOVUS201/share/license
复制完成后
python mgclicgen.py bc:24:11:3c:a6:b1
bc:24:11:3c:a6:b1就是之前ifconfig中的,这里需要:
这里生成的license 放置位置要根据环境的配置来
##############################################################
# Cadence Design Systems
#
# Master IC CAD flow including schematic capture, simulation, layout, and verification.
##############################################################
#!!!!!!!!!!!!!!!!!!!!!!!!!!!!!!!!!!!!!!!!!!!!!!!!!!!!!!!!!!!!#
export CADHOME=/opt/EDA/ca
#!!!!!!!!!!!!!!!!!!!!!!!!!!!!!!!!!!!!!!!!!!!!!!!!!!!!!!!!!!!!#

# Requied for Cadence on Linux
export LANG=C

# Set netlisting mode
export CDS_Netlisting_Mode=Analog

#+++++++++++++++++++++++++++++++++++++++++++++++++++++++++++++++++++++++
# Specify a search order for .cdsenv
#
# Load .cdsenv in the working directory ($CWD)
#+++++++++++++++++++++++++++++++++++++++++++++++++++++++++++++++++++++++
export CDS_LOAD_ENV=CWD

#+++++++++++++++++++++++++++++++++++++++++++++++++++++++++++++++++++++++
# browser setup for Cadence Help
#+++++++++++++++++++++++++++++++++++++++++++++++++++++++++++++++++++++++
export MOZILLA_HOME=/usr/bin/firefox

#+++++++++++++++++++++++++++++++++++++++++++++++++++++++++++++++++++++++
# Cadence - IC
#
# IC Schematic Entry, Simulation, Layout, Verification (Diva)
#+++++++++++++++++++++++++++++++++++++++++++++++++++++++++++++++++++++++
#!!!!!!!!!!!!!!!!!!!!!!!!!!!!!!!!!!!!!!!!!!!!!!!!!!!!!!!!!!!!#
export CDS=$CADHOME/IC618
#!!!!!!!!!!!!!!!!!!!!!!!!!!!!!!!!!!!!!!!!!!!!!!!!!!!!!!!!!!!!#

#+++++++++++++++++++++++++++++++++++++++++++++++++++++++++++++++++++++++
# Some of these variables are used by various other tools, e.g. foundry's PDK.
# Set them to be safe
#+++++++++++++++++++++++++++++++++++++++++++++++++++++++++++++++++++++++
export CDSDIR=$CDS
export CDSHOME=$CDS
export CADENCE_DIR=$CDS
export CDS_INST_DIR=$CDS
export CDS_ROOT=$CDS
export CDSROOT=$CDS

#+++++++++++++++++++++++++++++++++++++++++++++++++++++++++++++++++++++++
# Set up either CDS_LIC_FILE or LM_LICENSE_FILE, but NOT both or it'll
# take long time to search license!!!
#
# Set variable CDS_LIC_ONLY to ignore LM_LICENSE_FILE if it exists.
#
# Use absolute PATH to license.dat file instead of port@hostname
#
# The license server is no longer needed once all features are set to uncounted or 0
# (unlimited use) for the FEATURE lines in license.dat.  The SERVER, VENDOR and
# USE_SERVER lines can be safely removed from license.dat file, i.e. license.dat here
# contains FEATURE lines only.  DO NOT START UP LICENSE SERVER DAEMON!!!
#+++++++++++++++++++++++++++++++++++++++++++++++++++++++++++++++++++++++
#!!!!!!!!!!!!!!!!!!!!!!!!!!!!!!!!!!!!!!!!!!!!!!!!!!!!!!!!!!!!#
export CDS_LIC_FILE=$CDS/share/license/license.dat
export CDS_LIC_ONLY=1
#!!!!!!!!!!!!!!!!!!!!!!!!!!!!!!!!!!!!!!!!!!!!!!!!!!!!!!!!!!!!#

# Support for 64-bit executables (this should be set for 64-bit hosts - IMPORTANT!!!)
export CDS_AUTO_64BIT=ALL

#+++++++++++++++++++++++++++++++++++++++++++++++++++++++++++++++++++++++
# Master IC PATH
#
#+++++++++++++++++++++++++++++++++++++++++++++++++++++++++++++++++++++++
export PATH=$PATH:$CDSDIR/tools/dfII/bin:$CDSDIR/tools/plot/bin

#+++++++++++++++++++++++++++++++++++++++++++++++++++++++++++++++++++++++
# Set up OA (OpenAccess)
#
# It is STRONGLY recommended that you DO NOT change the OA installation that
# each tool uses because tools are tested with the version of OA shipped with the
# particular tool such as EDI142. However, if it is necessary to use a different
# version of OA, you can do so with one of the following approaches:
# 1) Use the Configure utility on InstallScape to specify a different OA installation.
# 2) Use the OA_HOME environment variable to override the default OA installation.
#
# DO NOT set up OA_HOME as recommended above!  Instead use the default OA
# installed within each Cadence tool, or use Configure utility on InstallScape to
# re-set OA back to the original default OA installation in each product such as.EDI,
# EXT, etc. if they were ever changed.
#+++++++++++++++++++++++++++++++++++++++++++++++++++++++++++++++++++++++

# Set up Cadence unsupported systems such as Ubuntu Linux
# IC617 supports Ubuntu14.04 so this variable is no longer required
#export OA_UNSUPPORTED_PLAT=linux_rhel50_gcc44x

# To run Virtuoso Schematic and Verilog Driven Mixed-Signal Flow,  the following
# environment variable must be set before starting Virtuoso.
export CDS_ENABLE_VMS=1

#+++++++++++++++++++++++++++++++++++++++++++++++++++++++++++++++++++++++
# Cadence Analog Simulators (MMSIM) - Spectre, SpectreRF, &
# RelXpert (Reliability Simulator)
#
#+++++++++++++++++++++++++++++++++++++++++++++++++++++++++++++++++++++++
#!!!!!!!!!!!!!!!!!!!!!!!!!!!!!!!!!!!!!!!!!!!!!!!!!!!!!!!!!!!!#
export MMSIMHOME=$CADHOME/SPECTRE211
export PATH=$PATH:$MMSIMHOME/bin:$MMSIMHOME/tools/relxpert/bin
#!!!!!!!!!!!!!!!!!!!!!!!!!!!!!!!!!!!!!!!!!!!!!!!!!!!!!!!!!!!!#

#+++++++++++++++++++++++++++++++++++++++++++++++++++++++++++++++++++++++
# Cadence QRC Extraction, Advanced Analysis & Modeling (EXT)
#
# Note: QRC must appear in the PATH before Assura executables
#+++++++++++++++++++++++++++++++++++++++++++++++++++++++++++++++++++++++
export QRC_HOME=$CADHOME/EXT191
export PATH=$PATH:$QRC_HOME/bin

# Enhance precision of QRC for DFM MOS extraction
export QRC_MOS_LW_PRECISION=Y

#+++++++++++++++++++++++++++++++++++++++++++++++++++++++++++++++++++++++
# Cadence Assura (ASSURA) - DRC. LVS, parasitic extraction
#
# These executables should be on the PATH after DFII executables
#+++++++++++++++++++++++++++++++++++++++++++++++++++++++++++++++++++++++
#export ASSURAHOME=$CADHOME/ASSURA41
#export PATH=$PATH:$ASSURAHOME/tools/bin:$ASSURAHOME/tools/assura/bin

# Setting this variable enables Assura to work with PVS licenses only without
# attempts to check-out Assura licenses first and thus speeds up execution.
#export ASSURA_USE_PVS_LICENSE=1

# Set up foundry DFM PATH for Assura - CRNxxG/CRNxxLP process for current project
export TSMC_ASU_DFM_PATH=/opt/PDKs/tsmc/CRNxxG/Assura/lvs_rcx/DFM
#export TSMC_ASU_DFM_PATH=/opt/PDKs/tsmc/CRNxxLP/Assura/lvs_rcx/DFM

#+++++++++++++++++++++++++++++++++++++++++++++++++++++++++++++++++++++++
# Cadence Physical Verification System, MaskCompose, & QuickView (PVS)
#
# K2_VIEWER_HOME must be set before Quickview is invoked. LM_LICENSE_FILE
# is required to run any K2 product.
#+++++++++++++++++++++++++++++++++++++++++++++++++++++++++++++++++++++++
export K2_HOME=$CADHOME/PVS151/tools/K2
export K2_VIEWER_HOME=$K2_HOME/Viewer
export K2_MASKCOMPOSE_HOME=$K2_HOME/MaskCompose
export K2_MC_DATA=$HOME/Projects
export LM_LICENSE_FILE=$CDS_LIC_FILE
export PATH=$PATH:$CADHOME/PVS151/bin:$CADHOME/PVS151/tools/bin:$K2_MASKCOMPOSE_HOME/bin
export XKEYSYMDB=$CDSDIR/tools/plot/etc/XKeysymDB

# Commands on terminal to launch Quickview or MaskCompose
#k2_viewer &
#k2_mcs &

##############################################################
# Cadence Digital Flow - HDL Simulations, Synthesis, P&R
#
##############################################################
# Genus Synthesis Solution (GENUS) - Logic & Physical Synthesis
export PATH=$PATH:$CADHOME/GENUS201/tools/bin
export PATH=/opt/EDA/cadence/GENUS201/tools.lnx86/bin:$PATH
# Command on terminal to launch Genus
# genus

# RTL Power Analysis (Joules)
export PATH=$PATH:$CADHOME/JLS151/bin

# Command on terminal to start Joules
# joules &

# Innovus Implementation System (INNOVUS) - P&R
pr() {
    local OA_HOME="/opt/EDA/ca/INNOVUS201/oa_v22.60.028"
    local INNOVUS_BIN="/opt/EDA/ca/INNOVUS201/bin/innovus"
    local PATH_ADD="/opt/EDA/ca/INNOVUS201/bin"

    if [ ! -d "$OA_HOME" ]; then
        echo "错误: OA_HOME 不存在: $OA_HOME"
        return 1
    fi

    if [ ! -x "$INNOVUS_BIN" ]; then
        echo "错误: Innovus 可执行文件不存在: $INNOVUS_BIN"
        return 1
    fi

    export OA_HOME
    export PATH="$PATH_ADD:$PATH"

    echo "已为 Innovus 设置环境。OA_HOME=$OA_HOME"
    echo "正在启动 innovus..."

    exec "$INNOVUS_BIN" "$@"
}
# Command on terminal to launch Innovus
# innovus &

#+++++++++++++++++++++++++++++++++++++++++++++++++++++++++++++++++++++++
# Cadence C-to-Silicon Compiler (CTOS)
#+++++++++++++++++++++++++++++++++++++++++++++++++++++++++++++++++++++++
export PATH=$PATH:$CADHOME/CTOS142/bin

# Command on terminal to launch CTOS
# ctosgui &

#+++++++++++++++++++++++++++++++++++++++++++++++++++++++++++++++++++++++
# Encounter Conformal (CONFRML) - Constraint Designer, Low Power Designer,
# & ECO Designer
#+++++++++++++++++++++++++++++++++++++++++++++++++++++++++++++++++++++++
export PATH=$PATH:$CADHOME/CONFRML152/bin

#+++++++++++++++++++++++++++++++++++++++++++++++++++++++++++++++++++++++
# Command on terminal to launch Confirmal with license options:
# -xl/-gxl/-rcv/-eco/-ecogxl/-lp/-lpxl/-ccd/-ccdxl/-lpgxl/-verify;
#  default is set to -l if no option is given.
# example:  "lec -lp -verify -gui &" for Low Power license and Verify license
#+++++++++++++++++++++++++++++++++++++++++++++++++++++++++++++++++++++++
# lec -lpgxl -verify -gui &

#+++++++++++++++++++++++++++++++++++++++++++++++++++++++++++++++++++++++
# Silicon Signoff & Verification (SSV) - including Tempus Timing Signoff
# & Voltus IC Power Integrity
#+++++++++++++++++++++++++++++++++++++++++++++++++++++++++++++++++++++++
export PATH=$PATH:$CADHOME/SSV152/tools/bin

# Command on terminal to launch tempus or voltus
# tempus &
# voltus &

#+++++++++++++++++++++++++++++++++++++++++++++++++++++++++++++++++++++++
# Incisive Verification Platform - Digital HDL simulators
#
#+++++++++++++++++++++++++++++++++++++++++++++++++++++++++++++++++++++++
export PATH=$PATH:$CADHOME/INCISIVE152/bin:$CADHOME/INCISIVE152/tools/bin::$CADHOME/INCISIVE152/tools/vtools/vfault/bin

#+++++++++++++++++++++++++++++++++++++++++++++++++++++++++++++++++++++++
# For 3-step (ncvlog, ncelab, and ncsim) flow to run Virtuoso AMS Designer simulator,
# the following library path environment variable has to be set.
#
# For single-step (irun) running AMS simulator, LD_LIBRARY_PATH is not required.
#+++++++++++++++++++++++++++++++++++++++++++++++++++++++++++++++++++++++
export LD_LIBRARY_PATH=$CADHOME/INCISIVE152/tools/lib/64bit:$CADHOME/INCISIVE152/tools/lib

# Enable noise analysis in AMS designer
AMS_ENABLE_NOISE=YES

#+++++++++++++++++++++++++++++++++++++++++++++++++++++++++++++++++++++++
# Set up Universal Verification Methodology (UVM) Environment Variables
#
# uvm_home defines the path to the UVM class library
# ml_uvm defines the path to the ml_uvm code
# ml_seq_dir defines the path to the SystemVerilog ml_uvm_seq package for using
# sequencer stubs
# The SystemVerilog package ml_uvm_seq is included in the Specman installation.
# To use it, you must add the following command-line options to your compilation flow,
# as additional command-line arguments to irun or ncvlog :
# irun ... ${ML_SEQ_DIR}/ml_uvm_seq.sv -incdir ${ML_SEQ_DIR}
#+++++++++++++++++++++++++++++++++++++++++++++++++++++++++++++++++++++++
export uvm_home=$CADHOME/INCISIVE152/tools/uvm
export ml_uvm=$CADHOME/INCISIVE152/tools/uvm/uvm_lib/uvm_ml/sc/ml_uvm
export ml_seq_dir=$CADHOME/INCISIVE152/specman/src

#+++++++++++++++++++++++++++++++++++++++++++++++++++++++++++++++++++++++
# Set up the HOME Environment Variable for Incisive Verification Kits
# Source the appropriate environment setup file (Note: a space is required
# between . and $SOCV_KIT_HOME/env.sh)
#+++++++++++++++++++++++++++++++++++++++++++++++++++++++++++++++++++++++
export SOCV_KIT_HOME=$CADHOME/INCISIVE152/kits/VerificationKit
#. $SOCV_KIT_HOME/env.sh

# Command on terminal to start up Incisive Verification Kits
# start_kit &

#***********************************************************************
# Command on terminal to launch NClaunch
#***********************************************************************
# nclaunch &

# Command on terminal to start up Specman & SimVision
# specman -gui &

# Command on terminal to invoke Desktop Manager
# emanager -desktop &
# vmanager &

# Encounter Diagnostics & Test (ET)
export PATH=$PATH:$CADHOME/ET151/bin

#+++++++++++++++++++++++++++++++++++++++++++++++++++++++++++++++++++++++
# Command on terminal to launch ET,  or with license options: -architect/-truetime/-diag
# commands eta, ett and ediag are equivalent to et -architect, et -truetime and et -diag
# which invokes Encounter Test Architect,  Encounter True_time Delay Test and
# Encounter Diagnostics, respectively.
#+++++++++++++++++++++++++++++++++++++++++++++++++++++++++++++++++++++++
# eta &
# ett &
# ediag &

#+++++++++++++++++++++++++++++++++++++++++++++++++++++++++++++++++++++++
# Verification IP Product Catalog (VIPCAT)
#
# VIP products are configured using a GUI called PureView.
#+++++++++++++++++++++++++++++++++++++++++++++++++++++++++++++++++++++++
export CDN_VIP_ROOT=$CADHOME/VIPCAT113
export CADENCE_VIP_LIC_ORDER=newrev:soc:portfolio:alacarte
export ABVIP_ISNT_DIR=$CDN_VIP_ROOT/tools/abvip
# In e , set SPECMAN_PATH to the location of the specific UVC directory
export SPECMAN_PATH=$PATH:$CDN_VIP_ROOT/utils:$CDN_VIP_ROOT/packages:$CDN_VIP_ROOT/vips/enet/vr_enet
export DENALI=$CDN_VIP_ROOT/tools/denali_64bit
export PATH=$PATH:$DENALI/bin
# In SV, add the UVC by including the specific VIP SV directory in the irun command:
#irun -incdir $CDN_VIP_ROOT/vips/enet/vr_enet/sv

# Command on terminal to launch PureView to configure VIP products.
# pureview

#+++++++++++++++++++++++++++++++++++++++++++++++++++++++++++++++++++++++
# Manufacturability and Variability Sign-Off (MVS) - Litho Analyzers,
# CMP Predictor
#+++++++++++++++++++++++++++++++++++++++++++++++++++++++++++++++++++++++
export PATH=$PATH:$CADHOME/MVS152/tools/bin

# Commands on terminal to launch Litho Analyzers, CMP Predictor
#lpa &
#lea &
# need to figure out correct license keys in license.dat for CMP Predictor
# (current ones don't work)
#cmms -ccp &
#cmms -ccpo &

#+++++++++++++++++++++++++++++++++++++++++++++++++++++++++++++++++++++++
# Library Characterizer (Liberate)
#
# Include the integrated Spectre in PATH
#+++++++++++++++++++++++++++++++++++++++++++++++++++++++++++++++++++++++
#export ALTOSHOME=$CADHOME/LIBERATE151
#export PATH=$PATH:$ALTOSHOME/bin
#export PATH=$PATH:$ALTOSHOME/tools.lnx86/spectre/bin
#export ALTOS_64=1

#+++++++++++++++++++++++++++++++++++++++++++++++++++++++++++++++++++++++
# Set up NCSU CDK
#
# This is optional for educational purpose; use foundry provided PDKs
# instead for production projects by including foundry PDKs in cds.lib
# in the working directory.
#+++++++++++++++++++++++++++++++++++++++++++++++++++++++++++++++++++++++
#!!!!!!!!!!!!!!!!!!!!!!!!!!!!!!!!!!!!!!!!!!!!!!!!!!!!!!!!!!!!#
export CDK_DIR=/opt/PDKs/ncsu-cdk-1.6.0.beta
#!!!!!!!!!!!!!!!!!!!!!!!!!!!!!!!!!!!!!!!!!!!!!!!!!!!!!!!!!!!!#

#+++++++++++++++++++++++++++++++++++++++++++++++++++++++++++++++++++++++
# Mentor Graphics Calibre
#+++++++++++++++++++++++++++++++++++++++++++++++++++++++++++++++++++++++
export MGC_HOME=/opt/EDA/ca
export CALIBRE_HOME=$MGC_HOME/aoj_cal_2022.2_38.20
export MGLS_LICENSE_FILE=$MGC_HOME/aoj_cal_2022.2_38.20/license.dat
export PATH=$PATH:$CALIBRE_HOME/bin
export MGC_LIB_PATH=$CALIBRE_HOME/lib

export CALIBRE_OS_MSG_LEVEL=1

#***********************************************************************
# Enable Calibre RealTime with Cadence Virtuoso
#***********************************************************************
export MGC_CALIBRE_REALTIME_VIRTUOSO_ENABLED=1

#+++++++++++++++++++++++++++++++++++++++++++++++++++++++++++++++++++++++
# This variable enables Calibre Interactive to save all GUI settings including default
# values to a runset file for future re-run
#+++++++++++++++++++++++++++++++++++++++++++++++++++++++++++++++++++++++
export MGC_CALIBRE_SAVE_ALL_RUNSET_VALUES=1

#+++++++++++++++++++++++++++++++++++++++++++++++++++++++++++++++++++++++
# Set up socket connection with Virtuoso schematic or layout viewer (using default ports
# 9199 for schematic and 9189 for layout) in the form of host:port
#+++++++++++++++++++++++++++++++++++++++++++++++++++++++++++++++++++++++
export MGC_CALIBRE_SCHEMATIC_SERVER=localhost:9199
export MGC_CALIBRE_LAYOUT_SERVER=localhost:9189

#+++++++++++++++++++++++++++++++++++++++++++++++++++++++++++++++++++++++
# The license server is no longer needed once all features are set to uncounted or 0
# (unlimited use) for the FEATURE lines in license.dat. file.  The SERVER, VENDOR and
# USE_SERVER lines can be safely removed from license.dat file, i.e. license.dat here
# contains FEATURE lines only.  DO NOT START UP LICENSE SERVER DAEMON!!!
#+++++++++++++++++++++++++++++++++++++++++++++++++++++++++++++++++++++++

#***********************************************************************
# Set the name of the executable for displaying PDF documentation from Calibre Help
# menu. The default is acroread if it exists.  Make sure evince has been installed before
# setting up the following (on Ubuntu type command "sudo apt-get install evince").
#***********************************************************************
export MGC_PDF_READER=evince

#+++++++++++++++++++++++++++++++++++++++++++++++++++++++++++++++++++++++
# Command on terminal to launch Cadence Virtuoso tools
#
# Adding & runs the process in the background allowing to continue using
# the current terminal.
#+++++++++++++++++++++++++++++++++++++++++++++++++++++++++++++++++++++++
#virtuoso &

#!!!!!!!!!!!!!!!!!!!!!!!!!!!!!!!!!!!!!!!!!!!!!!!!!!!!!!!!!!!!#
export SYSTEM_CDS_LIB_DIR=/opt/EDA/ca/IC618/share/cdssetup
#!!!!!!!!!!!!!!!!!!!!!!!!!!!!!!!!!!!!!!!!!!!!!!!!!!!!!!!!!!!!#
export OA_UNSUPPORTED_PLAT=linux_rhel60_64

# User specific aliases and functions
# User specific aliases and functions
####################
# cadence
#####################
export INCISIVDIR=/opt/EDA/cadence/XCELIUM1803/
export VRST_HOME=/opt/EDA/cadence/XCELIUM1803/
export LD_LIBRARY_PATH=$LD_LIBRARY_PATH:/opt/EDA/cadence/XCELIUM1803/tools.lnx86/lib
alias irun="/opt/EDA/cadence/XCELIUM1803/tools.lnx86/lib/bin/irun"
alias simv="/opt/EDA/cadence/XCELIUM1803/tools.lnx86/lib/bin/simvision"
alias simvision="/opt/EDA/cadence/XCELIUM1803/tools.lnx86/bin/simvision -64 &"
alias ncvlog="/opt/EDA/cadence/XCELIUM1803/tools.lnx86/bin/ncvlog"
alias ncsim="/opt/EDA/cadence/XCELIUM1803/tools.lnx86/bin/ncvsim"
alias ncelab="/opt/EDA/cadence/XCELIUM1803/tools.lnx86/bin/ncelab"
alias ncvhdl_p="/opt/EDA/cadence/XCELIUM1803/tools.lnx86/bin/ncvhdl_p"
export SPECMAN_HOME=$INCISIVDIR/components/sn
export SPECMAN_DIR=$SPECMAN_HOME/
export PATH="$PATH:$INCISIVDIR/bin"
export PATH="$PATH:$INCISIVDIR/tools.lnx86/bin"
export PATH="$PATH:$INCISIVDIR/tools.lnx86/dfII/bin"

alias i="icfb&"
alias v="virtuoso &"
WORKdir="~/newpdk/HHGRACE_PDK_BCD350GE/prj"
alias cdw="cd $WORKdir"
export CADHOME=/opt/EDA/ca 就是安装路径,需要修改成自己的
export SYSTEM_CDS_LIB_DIR=/opt/EDA/ca/IC618/share/cdssetup 同理
里面没安装的环境配置部分可以自己删除
#+++++++++++++++++++++++++++++++++++++++++++++++++++++++++++++++++++++++
# Mentor Graphics Calibre
#+++++++++++++++++++++++++++++++++++++++++++++++++++++++++++++++++++++++
export MGC_HOME=/opt/EDA/ca
export CALIBRE_HOME=$MGC_HOME/aoj_cal_2022.2_38.20
export MGLS_LICENSE_FILE=$MGC_HOME/aoj_cal_2022.2_38.20/license.dat
export PATH=$PATH:$CALIBRE_HOME/bin
export MGC_LIB_PATH=$CALIBRE_HOME/lib
python mgclicgen.py bc:24:11:3c:a6:b1所生成的
license.dat放在aoj_cal_2022.2_38.20目录下这里我有的2020版本是如上方安装步骤,2022版本将
aoj_cal_2022.2_38.20解压出来即可
pr() {
    local OA_HOME="/opt/EDA/ca/INNOVUS201/oa_v22.60.028"
    local INNOVUS_BIN="/opt/EDA/ca/INNOVUS201/bin/innovus"
    local PATH_ADD="/opt/EDA/ca/INNOVUS201/bin"

    if [ ! -d "$OA_HOME" ]; then
        echo "错误: OA_HOME 不存在: $OA_HOME"
        return 1
    fi

    if [ ! -x "$INNOVUS_BIN" ]; then
        echo "错误: Innovus 可执行文件不存在: $INNOVUS_BIN"
        return 1
    fi

    export OA_HOME
    export PATH="$PATH_ADD:$PATH"

    echo "已为 Innovus 设置环境。OA_HOME=$OA_HOME"
    echo "正在启动 innovus..."

    exec "$INNOVUS_BIN" "$@"
}
# Command on terminal to launch Innovus
# innovus &
这部分是因为
INNOVUS201和I618的OA版本不一样但是需要设置OA_HOME环境设置,不正确的版本会导致I618的崩溃,并且日志中没有相关报错难以排查所以单独写的。其他程序有相关OA_HOME设置请使用同样方式写,在终端中输入pr就可以启动INNOVUS。pr可以修改。
修改完成后
source ~/.bashrc就可以试试成功与否
3.3.3.1 将Calibre加入Virtuoso
Calibre就是为Virtuoso提供DRC与LVS等验证的软件,要在Virtuoso中加入需要先创建.cdsinit
/*
   filepath:        <cds_install_dir>/samples/local/cdsinit
   dfII version:    4.4

   This file should be copied as <cds_install_dir>/local/.cdsinit
   and customized as a site startup file. The site startup file is
   read and executed when the Design Framework II software starts.

   This file can load all the application configuration files and
   application bind key files.

   It also sets the library search path ( which may be overriden by the
   user customization file.

   Finally this file transfers control to the user by executing the
   user customization file.

   The user customization file may be

     ./.cdsinit - .cdsinit in the working directory
     ~/.cdsinit - .cdsinit in the user's home directory

   This site file checks if a .cdsinit exists in the working directory
   and executes it. If .cdsinit does not exist in the user's working
   directory then ~/.cdsinit is executed if it exists.


###################################################################
   Please read the entire file and the comments before you start
   customizing the file. See the section below on File Installation
   for a list of sample files supplied.

   There are bind key definition files supplied for different
   applications. The relevant bind key definitions files must
   be loaded if you want bind keys defined for that application.
   See section LOAD APPLICATION BIND KEY DEFINITIONS.
###################################################################

   In order for any window placements to work correctly the following
   X resource must be set in the .Xdefaults or .xresources file
   pertaining to your hardware platform.

	Mwm*clientAutoPlace:             False

   After setting the resource read in the resource file with the command

	xrdb <resource_filename>

   and restart the Motif window manager.

   The function

             prependInstallPath("string")

   adds the installation path to the string argument
   For this reason there should NOT be a space at the beginning of the
   string.
   There SHOULD be a space at the end of the string if more paths are to
   follow.
   This function is used to make path specification in this file
   independant of the exact installation path.

   The function let() creates local variables ( example: libPath ).
   This makes sure that any global variables are not accidentally modified.

*/
/*
;;;;;;;;;;;;;;;;;;;;;;;;;;;;;;;;;;;;;;;;;;;;;;;;;;;;;;;;;;;;;;;;;;;;;;;;;
;
;  File Installation
;  -----------------
;
;  CONFIGURATION FILES
;
;  The following configuration files are delivered in the 4.4 release:
;  <cds_install_dir>/samples/local
;          aaConfig.il                  - analog
;          dciConfig.il                 - Cadence to Synopsys Interface
;          metConfig.il                 - Designing with Composer
;                                         using metric measurements
;          sysConfig.il                 - systems
;          uiConfig.il                  - user interface
;
;  The configuration files are used to initialize parameters and
;  forms.
;
;  ENVIRONMENT VARIABLES
;  Schematic, Layout and Graphic environment variable defaults are now found in
;  <cds_install_dir>/etc/tools/
;				layout/.cdsenv
;				schematic/.cdsenv
;				graphic/.cdsenv
;
;  These can be customized in the user's ./cdsenv and ~/.cdsenv files.
;  A .cdsenv file can be created by using CIW->options->save defaults.
;
;
;  BIND KEY DEFINITION FILES
;
;  The following bind key definition files are delivered in the
;  4.3 release:
;  <cds_install_dir>/samples/local
;          leBindKeys.il                - layout editor
;          schBindKeys.il               - schematic editor
;
;  CUSTOMIZATION FILES
;
;  The following customization files are delivered in the
;  4.3 release:
;  <cds_install_dir>/samples/local/cdsinit          - site customization
;  <cds_install_dir>/cdsuser/.cdsinit               - user customization
;
;									;
;  ADMINISTRATION
;
;  The site administrator should install the "site" files as follows:	;
;
;  1. Copy <cds_install_dir>/samples/local/cdsinit
;       to <cds_install_dir>/local/.cdsinit
;     and modify the file
;     (If <cds_install_dir>/local does not exist create it)
;
;     <cds_install_dir>/local is the site customization directory.
;     This directory is not sent as part of the software. The site
;     administrator must create this directory. Whenever software is
;     upgraded the Cadence installation process retains the site
;     administration directory if it exists.
;
;
;  2. If default configuration needs to be changed copy the
;     relevant configuration file
;             from:  4.3/samples/local
;             to:    4.3/local
;     and modify the file(s)
;
;  3. If default bind key definitions need to be changed copy the
;     relevant bind key definition file
;             from:  4.3/samples/local
;             to:    4.3/local
;     and modify the file(s)
;
;  4. Copy 4.3/cdsuser/.cdsinit to the user's home or working
;     directory - Do this step only if the user does not already
;     have a .cdsinit file.
;
;     If after site customization each user wants to customize
;     portions of the configuration or bind keys definitions
;     they should copy the relevant sections from the files in
;
;                4.3/samples/local
;     into
;
;                the user's customization file
;                ./.cdsinit   or    ~/.cdsinit
;
;
;  FILE LOADING ORDER
;  ------------------
;  1. The configuration files are not automatically loaded.
;     Remove the comment on the filename line to load the file.
;     The search order for the configuration files is:
;
;           .
;           ~
;           4.3/local
;
;  2. The bind key definition files are not automatically loaded.
;     Remove the comment on the filename line to load the file.
;     The search order for the bind key definition files is:
;
;           .
;           ~
;           4.3/local
;           4.3/samples/local
;
;  3. Load user customization file
;
;         ./.cdsinit - load .cdsinit in the working directory if it exists
;     else
;
;         ~/.cdsinit - load .cdsinit in the user's home directory
;     This file does NOT load both user customization files even if both exist.
;
;
;;;;;;;;;;;;;;;;;;;;;;;;;;;;;;;;;;;;;;;;;;;;;;;;;;;;;;;;;;;;;;;;;;;;;;;;
*/
;
;
;################################################
;#
;# LOAD APPLICATION CONFIGURATION FILES
;#
;################################################
;
;Remove the comment ; if you want to load the specific configuration file
;If you do not load the configuration files the applications will use the
;default configurations.
;
;
let( (configFileList file path saveSkillPath)
    configFileList = '(
;                 "aaConfig.il"
;                 "dciConfig.il"
;                 "leConfig.il"
;                 "metConfig.il"
;                 "schConfig.il"
;                 "sysConfig.il"
;                 "uiConfig.il"
                    )

;   This is the path that is searched for the files
;
    path = strcat(
;
;   If you want to add another path add it here as a string
;
              ".  ~  "
              prependInstallPath("local ")
             )
    saveSkillPath=getSkillPath()
    setSkillPath(path)

    foreach(file configFileList
       if(isFile(file) then
          loadi(file)
         )
    )
    setSkillPath(saveSkillPath)
)

;
;################################################
;#
;# LOAD APPLICATION BIND KEY DEFINITIONS
;#
;################################################
;
;Add the comment ; if you do not want to load the specific
;bind key definition file.
;
;If you do not load the bind key definitions the applications will not
;have any bind keys defined.
;
;If you load the bind key definition file but the application is not
;registered ( product not licensed or checked out ) then you might get
;a warning that looks like
;
; *WARNING* "Schematics is not registered yet"
;
;This warning can be ignored if you know that the product is not
;licensed or checked out.
;
let( (bindKeyFileList file path saveSkillPath)
    bindKeyFileList = '(
                   "leBindKeys.il"
                   "schBindKeys.il"
                    )

;   This is the path that is searched for the files
    path = strcat(
;
;   If you want to add another path add it here as a string
;
              ".  ~  "
              prependInstallPath("local ")
              prependInstallPath("samples/local")
             )
    saveSkillPath=getSkillPath()
    setSkillPath(path)

    foreach(file bindKeyFileList
       if(isFile(file ) then
          loadi(file)
         )
    )
    setSkillPath(saveSkillPath)
)

;  An individual user may wish to add some bindkeys of his/her own or
;  over ride some default loaded bindkeys.  For more information about
;  bindkeys see the manual "SKILL Reference Manual, Language Fundamentals",
;  Chapter 4.
;
;  Here is an example of setting one bindkey on "F2" than prints
;  "Hello world" to the CIW when pressed in the CIW.
;hiSetBindKey("Command Interpreter" "<Key>F2" "printf(\"Hello World\")")
;
;  Here is an example of setting keys for more than one application
;let( (app appList)
; appList = '(
;	"Command Interpreter"
;    "Schematics"
;    "Symbol"
;
;    Add other applications here
;
;    )
;
;
;  foreach(app appList
;    hiSetBindKey(app "<Key>F4" "printf(\"Hello \")")
;    hiSetBindKey(app "<Key>F5" "printf(\"World\")")
;  )
;)
;
;
;
;################################################
;#
;# SETTINGS FOR SKILL PATH and SKILL PROGRAMMING
;#
;################################################
;
;  The function sstatus() sets the status of variables
;  The variable writeProtect controls if a SKILL function can be
;  redefined or not;
;
;  Any functions defined after writeProtect = t CANNOT be redefined
;  Any functions defined after writeProtect = nil CAN be redefined
;  If you are going to create SKILL programs and define functions set the
;  status of writeProtect to nil at the beginning of your session.
;
;  Set skill search path. The SKILL search path contains directories
;  to be searched to locate SKILL programs when program names are
;  specified without full path names.
;  The operation could be reading, writing or loading a SKILL program.
;
;  Source technology files are considered SKILL files and when loading
;  or dumping the technology file SKILL search path will be used.
;
;

sstatus(writeProtect nil)

let((skillPath)
   skillPath= strcat(
    ". ~ "                                          ; Current & home directory
    prependInstallPath("samples/techfile ")         ; sample source technology files
   )
   setSkillPath(skillPath)
)
;
;################################################
;#################################################
;  VERIFICATION - DIVA/INQUERY/DRACULA ENCAPS    #
;#################################################
;
; There are no configuration variables for these
; applications to be set in the .cdsinit. You may
; need to create a .simrc  file, using the example
; in <cds_install_dir>/cdsuser/.simrc
;
;#################################################
;# PLACE AND ROUTE - CELL3, CE, BE, PREVIEW,GE   #
;#################################################
; The geSetProbeNetStopLevel default is zero.
; To probe routing in channels, it must be >= 2.
; geSetProbeNetStopLevel(0)  ; 20 is a good number.
;
;#################################################
;# LAS and COMPACTOR                             #
;#################################################
; There are no configuration variables for these
; applications to be set in the .cdsinit. You need
; to add information to your technology file. See
; the LAS and COMPACTOR reference manuals for
; details about technology file additions.
;
;##############################################
;# Customizing the 4.x environment with:      #
;# SETTING AmPLD DEFAULTS (Data I/O Abel 4.x) #
;##############################################
; No Setup is required if using the default system shipped from Cadence.
; If you are using your own Abel or need to customize the system Please
; See Appendix A of the Programmable Logic Design System Users Guide.
;
;##############################################
;# Customizing the 4.x environment with:      #
;# DESIGN FLOWS                               #
;##############################################
; The design flows can be used with no customization, but customizing
; them for your personal preference can greatly enhance your
; productivity. Please See the Design Flow users guide for details.
;
;  Bring up top flow ...
;
;amdfTopFlow()
;
;
;################################################
;#
;# MISCELLANEOUS
;#
;################################################
;
; Set your own prompt in the CIW. The first argument is the prompt.
; The second argument is not used yet.
;
; The variable editor defines the text editor to be used when any of
; the applications invoke an editor. For example technology dump and
; edit operation opens an editor window.
;
; The editor may also be set by
;
;         unix environment variable EDITOR
;
;             setenv EDITOR 'xedit'
;
;
; When Design Framework is invoked the SKILL variable editor is set
; to the value of the unix variable EDITOR.
;
; If EDITOR is not defined the SKILL variable
; editor is set to "vi"
;
; You may also set the variable to execute a UNIX command
; that invokes an xterm window of given size and location
; and starts an editor program.
; Example:
;
;    editor = "xterm -geometry 80x40 -e emacs"
;
; Size of xterm in the above example is 80 characters by 40 lines.
; With some editors on certain platforms the variable editor must
; be defined as shown above.
;
; Some application which require a text editor may be using the UNIX
; variable EDITOR instead of the SKILL variable editor. It is a good
; idea to set the UNIX variable EDITOR to the text editor of your
; choice which will automatically set the SKILL variable editor.
;
;
;setPrompts("Ready >" "")
;editor = "xterm -geometry 85x50 -e vi";
;
;
printf("END OF SITE CUSTOMIZATION\n")
;
;
;################################################
;#
;# LOAD USER CUSTOMIZATION FILE
;#
;################################################
;
;The site customization file is going to load the user
;customization file. In case you have copied this site
;customization file as your user customization file
;comment out or remove the next section to prevent
;recursive loading of ./.cdsinit
;
;if( isFile( "./.cdsinit" ) then
;   printf( "Loading ./.cdsinit init file from the site init file.\n" )
;    loadi( "./.cdsinit" )
;else
; if( isFile( "~/.cdsinit" ) then
;    printf( "Loading $HOME/.cdsinit init file from the site init file.\n" )
;    loadi( "~/.cdsinit" )
; )
;)
;
;setSkillPath("/opt/EDA/ca/aoj_cal_2022.2_38.20/shared/pkgs/icv/tools/queryskl")
;load( "calibre.skl")

;END OF THE SITE CUSTOMIZATION FILE
;;;;;;;;;;;;;;;;;;;;;;;;;;;;;;;;;;;;;;;;;;;;;;;;;;;;;;;;;;;;;;;;;;;;;;;;;;;;;;;;;

;
; check MGC_HOME
;
mgc_home=getShellEnvVar("MGC_HOME")

if( mgc_home!=nil && isDir(mgc_home) && isReadable(mgc_home) then

    ; Load calibre.skl or calibre.4.3.skl, not both!

    ; Load calibre.skl for Cadence versions 4.4 and greater
    load(strcat(mgc_home "/aoj_cal_2022.2_38.20/shared/pkgs/icv/tools/queryskl/calibre.skl"))

;;;;Load calibre.4.3.skl for Cadence version 4.3
;;; load(strcat(mgc_home "/lib/calibre.4.3.skl"))

else

    ; MGC_HOME is not set correctly. Report the problem.

    printf("//  Calibre Error: Environment variable ")

    if( mgc_home==nil || mgc_home=="" then
        printf("MGC_HOME is not set.");
    else
        if( !isDir(mgc_home) then
            printf("MGC_HOME does not point to a directory.");
        else
            if( !isReadable(mgc_home) then
                printf("MGC_HOME points to an unreadable directory.");
            )
        )
    )
    printf(" Calibre Skill Interface not loaded.\n")

    ; Display a dialog box message about load failure.
    hiDisplayAppDBox(
        ?name           'MGCHOMEErrorDlg
        ?dboxBanner     "Calibre Error"
        ?dboxText       "Calibre Skill Interface not loaded."
        ?dialogType     hicErrorDialog
        ?dialogStyle    'modal
        ?buttonLayout   'Close
    )
)

;;;;;;;;;;;;;;;;;;;;;;;;;;;;;;;;;;;;;;;;;;;;;;;;;;;;;;;;;;;;;;;;;;;;;

;;;;;;;;;;;;;;;;;;;;;;;;;;;;;;;;;;;;;;;;;;;;;;;;;;;;;;;;;;;;;;;;;;;;;
;;;simulator startup initial settings
envSetVal( "asimenv.startup" "projectDir" 'string "./simulation")
envSetVal( "asimenv"         "saveDir"    'string "./.artist_states")
;;;;;;;;;;;;;;;;;;;;;;;;;;;;;;;;;;;;;;;;;;;;;;;;;;;;;;;;;;;;;;;;;;;;;

;;;;;;;;;;;;;;;;;;;;set editor to gvim;;;;;;;;;;;;;;;;;;;;;;;;;;;;;;;;;;
editor = "gvim"

;;;;;;;;;;;;;;;;;;;;set digit number;;;;;;;;;;;;;;;;;;;;;;;;;;;;;;;;;;
aelPushSignifDigits(3)

;;;;;;;;;;;;;;;;;;;;set env for layout ;;;;;;;;;;;;;;;;;;;;;;;;;;;;;;;;;;
leSetEnv("labelText" "")
leSetEnv("labelHeight" 1)
leSetEnv("labelFrontStyle" "roman")
leSetEnv("flattenMode" "one level")
;leSetEnv("flattenMode" "displayed levels")
leSetEnv("flattenPcells" "t")
leSetEnv("snapMode" "diagonal")
;;;;;;;;;;;;;;;;;;;;set env for layout ;;;;;;;;;;;;;;;;;;;;;;;;;;;;;;;;;;

;;;;;;;;;;;;;;;;;;;;set default model for asim ;;;;;;;;;;;;;;;;;;;;;;;;;;;;;;;;;;
asiSetEnvOptionVal(asiGetTool('spectre) "modelFiles"
	list(
		list("~/prj/CETC580802.lib" "tt")
		list("#" "~/prj/CETC580802.lib" "ss")
		list("#" "~/prj/CETC580802.lib" "ff")
)
)
;;;;;;;;;;;;;;;;;;;;Bindkey for schematic ;;;;;;;;;;;;;;;;;;;;;;;;;;;;;;;;;;
;hiSetBindKey("Schematics" "<key>1" "sevChooseEnvironmentOptions(hiGetCurrentWindow()->sevSession)")
hiSetBindKey("Schematics" "<key>6" "aelPushSignifDigits(3)")
hiSetBindKey("Schematics" "ctrl<key>f" "schHiFind()")
hiSetBindKey("Schematics" "<key>F1" "deOpen()")
hiSetBindKey("Schematics" "<key>F2" "deNew()")

hiSetBindKey("Schematics" "shift<key>r" "sevNetlistAndRun(hiGetCurrentWindow()->sevSession)")
hiSetBindKey("Schematics" "<key>1" "sevEditSelectedAnas(hiGetCurrentWindow()->sevSession)")
hiSetBindKey("Schematics" "<key>2" "sevEditSelectedVars(hiGetCurrentWindow()->sevSession)")
hiSetBindKey("Schematics" "<key>3" "sevAnnotateResults((hiGetCurrentWindow()->sevSession) 'dcNodeVoltages))")
hiSetBindKey("Schematics" "<key>4" "sevAnnotateResults((hiGetCurrentWindow()->sevSession) 'dcOpPoints))")
hiSetBindKey("Schematics" "<key>5" "sevAnnotateResults((hiGetCurrentWindow()->sevSession) 'defaults))")
;;hiSetBindKey("Schematics" "alt<key>s" "sevCreateMainWindow((hiGetCurrentWindow()->sevSession))")
hiSetBindKey("Schematics" "Shift<key>1" "sevDirectPlot((hiGetCurrentWindow()->sevSession) 'asiDirectPlotResultsMenuCB)")
hiSetBindKey("Schematics" "Shift<key>2" "sevEditModels((hiGetCurrentWindow()->sevSession))")
hiSetBindKey("Schematics" "Shift<key>3" "sevChooseTemperature((hiGetCurrentWindow()->sevSession))")
hiSetBindKey("Schematics" "Shift<key>`" "sevEvaluateAndPlotExpressions((hiGetCurrentWindow()->sevSession))")
hiSetBindKey("Schematics" "<key>0" "geDeleteAllProbe(getCurrentWindow() t)")
;;;;;;;;;;;;;;;;;;;;Bindkey for layout;;;;;;;;;;;;;;;;;;;;;;;;;;;;;;;;;;
hiSetBindKey("Layout" "<key>5" "leiMouseSetEntryLayer(28)")
hiSetBindKey("Layout" "<key>d" "leHiCreateMPP()")
hiSetBindKey("Layout" "<key>a" "leHiAlign()")
hiSetBindKey("Layout" "<key>1" "leHiConvertShapeToPolygon()")
hiSetBindKey("Layout" "<key>2" "leHiModifyCorner()")
hiSetBindKey("Layout" "<key>3" "leHiMakeCell()")
hiSetBindKey("Layout" "<key>4" "leHiFlatten()")
hiSetBindKey("Layout" "None<Btn4Down>" "hiZoomInAtMouse()")
hiSetBindKey("Layout" "None<Btn5Down>" "hiZoomOutAtMouse()")
hiSetBindKey("Layout" "<key>F1" "deOpen()")
hiSetBindKey("Layout" "<key>F2" "deNew()")
将
;setSkillPath("/opt/EDA/ca/aoj_cal_2022.2_38.20/shared/pkgs/icv/tools/queryskl")一行的路径改为自己的安装路径
load(strcat(mgc_home "/aoj_cal_2022.2_38.20/shared/pkgs/icv/tools/queryskl/calibre.skl"))一行的aoj_cal_2022.2_38.20改成自己所安装的版本。
四, 相关问题
等待留言
.png)